Discussions
What is the Discussions Tool?
Use the Discussions tool in your course to encourage students to share thoughts on course material with their peers. You can set up forums and topics for students to ask questions, discuss course content and assignments, and work together in assigned groups.
Accessing the Discussions Tool
The Discussions tool is one of the links found on the default navigation bar of your CourseLink course site and can be accessed directly from that link.
Location of the discussions link on a face-to-face course site
For Distance Education (DE) courses, the link appears under the drop-down menu of the Tools link on the navigation bar (provided that the course is using Dropbox).
If you are using a custom navigation bar and the Discussions link has been removed, you may re-add it. For more information on that process, please see our Navigation Bar page.
New Discussions Experience: Creating an open topic
The default setting for a topic is “open”.
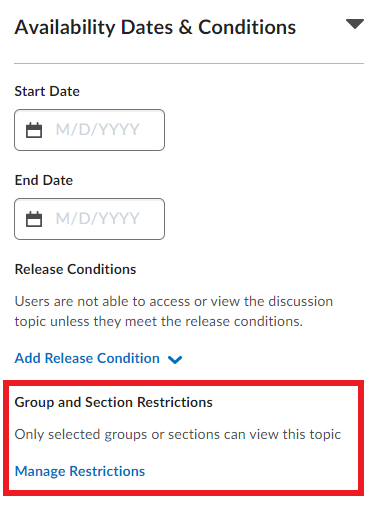
Although the message under Group and Section Restrictions says, “Only selected groups or sections can view this topic”, as long as you don’t restrict the topics to specific groups, it will remain open for all students. This is a somewhat confusing message.
You can verify that the discussion topics are open to all students by reviewing the Group and Section Restrictions and confirming that “Restrict topic” is selected (confusing language) and none of the options below are selected.
Create a Group Discussion:
To connect groups to a discussion topic in CourseLink, follow these steps:
Navigate to Discussions in the navbar.
Create a Discussion Forum:
If you don’t already have a forum, click "New Forum" and give it a title (e.g., "Group Discussions").
Save the forum.
Create a Discussion Topic:
Within the forum, click "New Topic."
Choose the forum you just created.
Enter a Title and Description for the topic.
Restrict to Groups:
Under "Availability Dates & Conditions" click on “Manage Restrictions” under "Group or Section Topic."
Select “Restrict topic and separate the threads” as users in the selected groups/sections can view this topic but will only see threads from their group/section.
From the dropdown menu, choose the Group Category you created earlier.
Set Additional Options:
Configure settings like availability dates, grading, and assessment options as needed.
Click "Save and Close."
Using the Discussions Tool
For the most up-to-date information on how to use the Discussions tool, please follow the links below to the Brightspace Help documentation site.
Getting started with discussions
Moderating Discussions
Assessing Discussions
Tutorial Videos
Discussion Tool FAQs
Need More Help?
If you're still having trouble, please contact the CourseLink Support team for assistance.


