Instructors: CourseLink Tools — CourseLink Documentation & Support

Instructors: CourseLink Tools

The information on this page is intended for instructors using a CourseLink course site.

Posts by Owen Wooding
Classlist-linked Microsoft Security Groups

Classlist-linked Microsoft Security Group

Classlist-linked Microsoft Security Groups are the result of a collaborative project between CCS and OpenEd.

Microsoft Security Groups are used to grant and limit access to various to Microsoft resources such as files stored on OneDrive and Stream videos.

Through CourseLink’s Course Creation Tool, each course site may have a Microsoft Security Group created that will synchronize that course site’s Classlist tool with a Microsoft Security Group via an unique name (i.e. DEMO_1000_01_F22_654321) - a Classlist-linked Microsoft Security Group.

Once linked, the Classlist-linked Microsoft Security Group memberships are updated daily to ensure that any changes to a course site’s class list are also reflected in the corresponding Microsoft Security Group within a 24-hour window. This means that if a user (i.e., a student) is added to or removed from a CourseLink course site’s Classlist tool, they will also gain or lose access to the corresponding resource that was shared using that Classlist-linked Microsoft Security Group within 24 hours.

Please note that instructors and TAs that appear on a course site’s Classlist tool will be added to the security group within 24 hours of its creation. However, students will not be added to the security group until/unless the course site’s start date has passed. This allows instructors to setup shares using Classlist-linked Microsoft Security Groups ahead of class without worry that students will gain access before class begins.


Enabling the Classlist-linked Microsoft Security Group

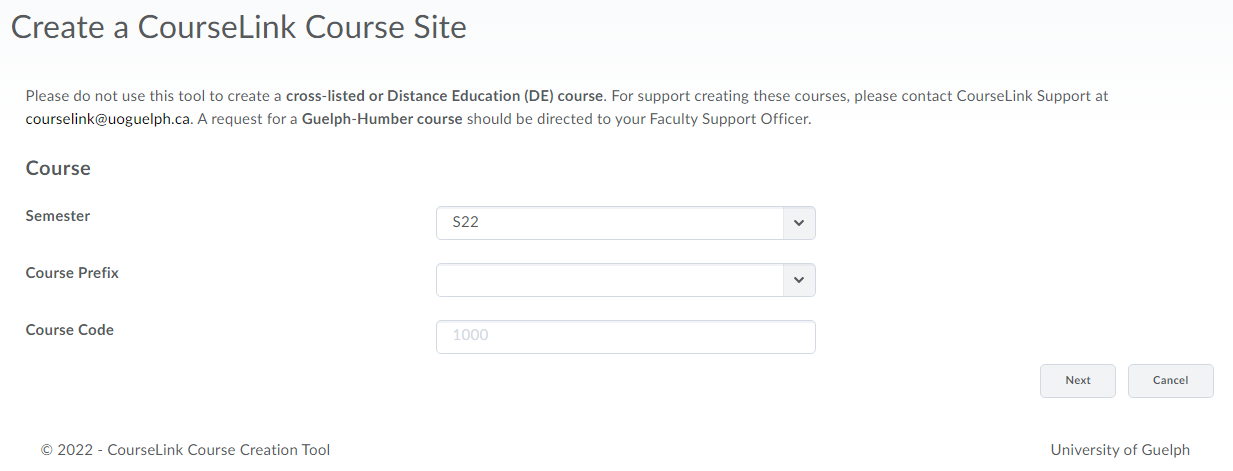
Instructors can enable a Classlist-linked Microsoft Security Group when creating or updating a CourseLink course site using the CourseLink Course Creation Tool.

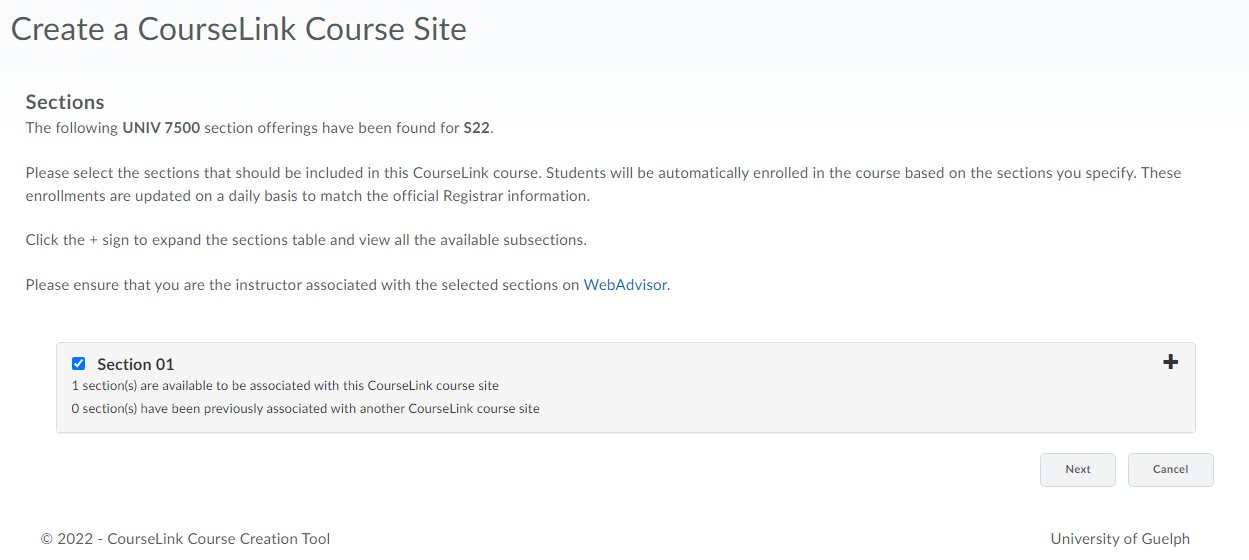
Once all the appropriate sections for the course site have been selected, instructors will be presented with the option to link the course site with a Microsoft Security Group.

The image shows you where to click to allow the Classlist-linked Microsoft Security Group to be created for the course. The text and check box is in a red box to indicate where to look.

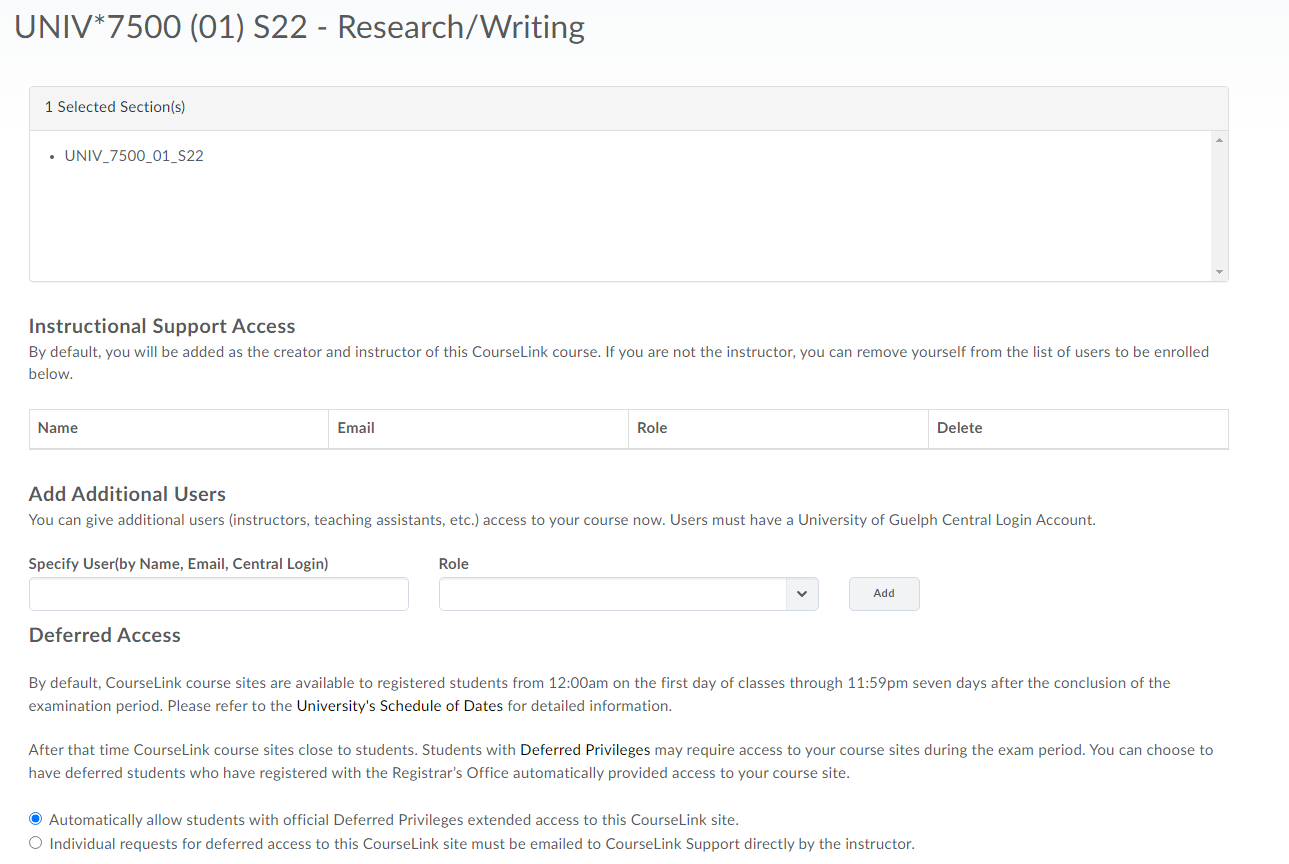
Location of the create CLMSG option.

Selecting the Create and link Microsoft Security Group to this course site’s Classlist tool option will enable the creation and maintenance of a Classlist-linked Microsoft Security Group.


Locating and Identifying the Classlist-linked Microsoft Security Group

A unique security group name will be generated once the course site has been created or the existing course has been updated with Classlist-Linked Security Groups enabled.

Please note that the security group name will appear in the success message displayed once the course site creation process is complete.

The image shows where to look for the Microsoft security group text. There is a copy to clipboard button to the right of it.

Locations of the CLMSG code in the course creation success message.


You may also locate the security group name for any of your course sites with Classlist-linked Microsoft Security Groups enabled by using the Course Creation Tool’s Update Course option.

A page showing all CourseLink Courses you have access to as an instructor. It has red boxes around the Linked Security group text/code. There is a copy to clipboard button to the right.

Locations of the CLMSG codes on the update course sites section of the CourseLink Course Creation tool.


To uniquely identify and easily recognize each security group, its name is automatically generated as an amalgamation of the CourseLink Course Offering Code and the CourseLink course site’s OUID (OUIDs are the last 6 digits of a course site’s homepage URL). For example, if your course code is DEMO_1000_01_F22 and your course site’s OUID (org unit id) is 654321, then your Classlist-linked Microsoft Security Group name will be created as DEMO_1000_01_F22_654321.

NOTE: Once the security group is created, please do not attempt to modify your CourseLink Course Offering Code to alter the name, as the group name is locked on creation.

Once created, Classlist-linked Microsoft Security Groups are synchronized with the appropriate CourseLink site’s Classlist once nightly.  Security groups must be enabled before 7:00 pm to be included in the nightly update. Creation and processing of security group memberships are completed by 8:00 am the next day.


Using the Classlist-linked Microsoft Security Group

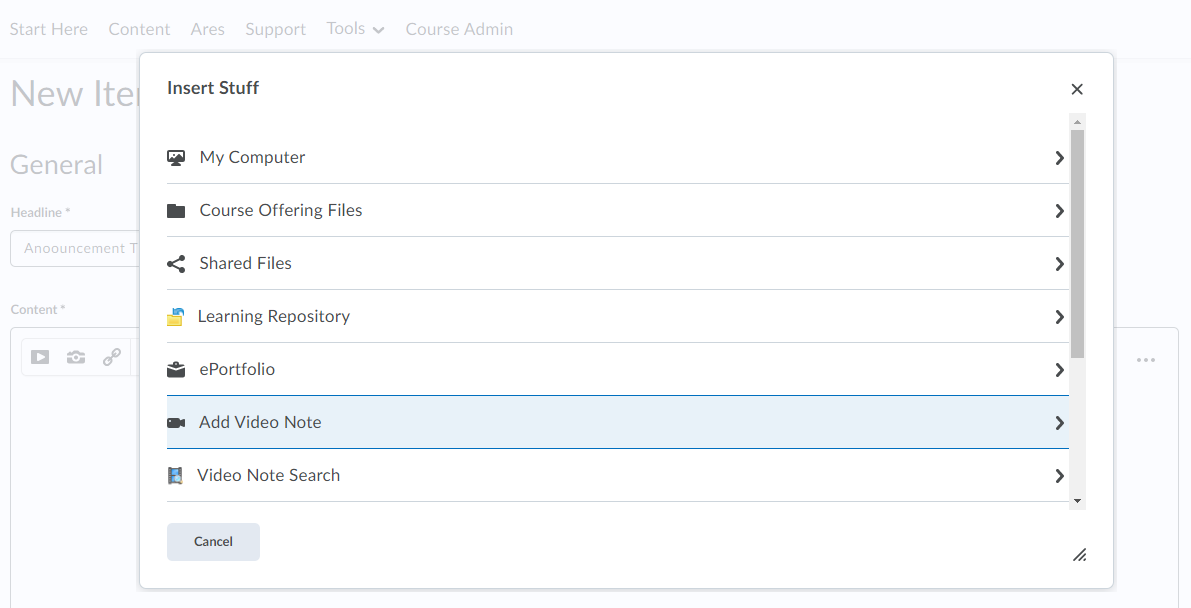
To assign a Classlist-linked Microsoft Security Group to a resource, such as an O365 document, or video stored on OneDrive, use the Share with option within the application and search for the group code that was generated in the CourseLink Course Creation tool (i.e., DEMO_1000_01_F22_654321).

Searching for the CLMSG in OneDrive’s share window. The image has a red box around the fields (who can view, a search bar...) important to the user.

Searching for the CLMSG in OneDrive’s share window.

NOTE: Security groups are considered People when searching and will not appear if you try to share using My Groups in Microsoft Stream.

An Image searching for the Classlist-linked Microsoft Security Group it can be seen in the dropdown menu.

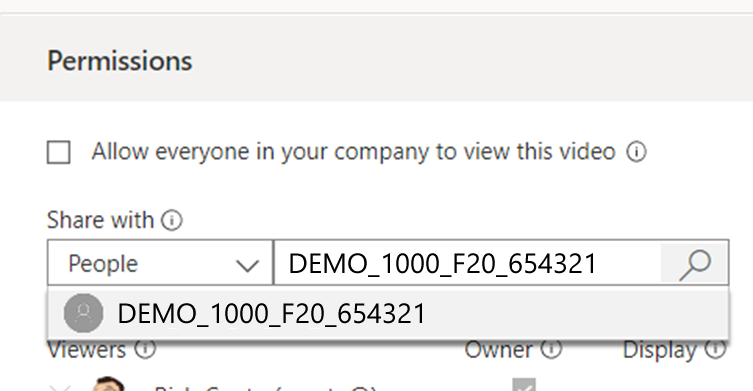
After searching for the Classlist-linked Microsoft Security Group it can be seen in the dropdown menu.

Sharing to a Classlist-linked Microsoft Security Group can be done for each individual file or resource you wish to share with that group . If you are using OneDrive to store files you plan to share with your class, you may share specific files, or share a folder that contains multiple files with the corresponding Classlist-linked security group. If you share a folder with a security group, you can then simply copy a link for any file in that folder and share it with anyone on your CourseLink course site’s Classlist via the Content tool, email, etc. You will not need to share each file in that folder individually with the security group.

Please note that files in shared OneDrive folders inherit the permissions of the folder. This means that if the folder is shared to the security group and the allow editing option is enabled, then everyone on the course site’s class list (including students) will be able to edit and delete any shared files/documents from that folder. Any deleted files or folders will be placed in the owner’s OneDrive Recycle Bin and can be easily restored by the owner with all the original share permissions within 93 days . If the folder is shared to the security group with view only access, then everyone on the class list (including students) will not be able to edit or delete files/documents shared from that folder. The exception being the instructor, provided they are the owner of the file, or anyone that has been granted additional edit permissions by the file/resource owner.


Expiration of Access for Classlist-linked Microsoft Security Group Members

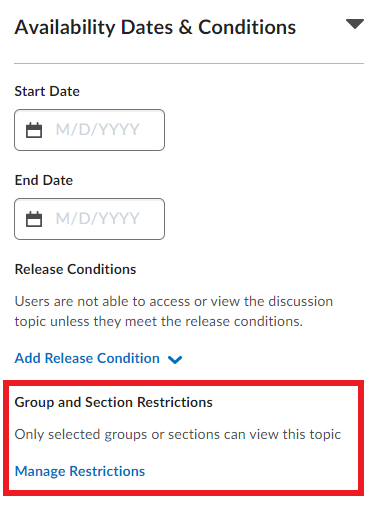
Security groups are cleared of non-instructor level members (students, TAs, guests, etc.) as of the access end date for the associated CourseLink course site. This means that when a user can no longer access a course site due to the passing of its end date, they will also lose access to any files or services (OneDrive documents, Stream videos, etc.) shared via the course site’s Classlist-linked Microsoft Security Group.

The files or services shared to that security group will be otherwise unaffected and the owner(s) will maintain access. Instructor-level users, those with the Instruct-facilitator or Instruct-build-grade roles on the Classlist tool, will also maintain membership to the security group and access to any shared files or resources after the access end date of the course site.


Deferred Students and Classlist-linked Microsoft Security Groups

If a student is granted deferred access to a CourseLink course site with the Deferred Student role within 18 months of its end date, they will be automatically re-added to the Classlist-linked Microsoft Security Group associated with that course site within 24 hours. This will restore access for deferred students to any resources previously shared for that course, provided they have not been deleted or had the share to the security group removed by their owner.

When a student’s deferred access to a course site ends, they are removed from the course site’s Classlist tool, which in turn will also automatically remove them from the associated Classlist-linked Microsoft Security Group within 24 hours.


Deletion of Classlist-linked Microsoft Security Groups

Classlist-linked Microsoft security groups are automatically deleted 18 months after their associated course site’s end date has passed.

Once the security group is deleted, any access provided to shared files or services through that group is also removed.

Only the Classlist-linked Microsoft security group is deleted. The files shared to that group are unaffected. The files/resources and any other sharing permissions associated with them are not impacted when the security group is deleted.

Please note that even after the security group is deleted, the owner’s files/resources on OneDrive may still indicate that the security group share exists, but the files/resources will no longer be shared as the security group no longer exists.


Need More Help?

If you're still having trouble, please contact the CourseLink Support team for assistance.


Course Creation Tool

What is the Course Creation Tool?

The Course Creation tool has two ways in which you can setup a course:

  1. Create a CourseLink course site is used if you are creating a new CourseLink for the first time.

  2. Update a CourseLink course site is used if you have already created a CourseLink site for your course, but need to add or remove sections (E.g. adding an auditing section).

Review the sections and courses available through WebAdvisor before creating a CourseLink course site.


Cross-listed courses

Cross-listed courses are CourseLink sites with more than one course number or department code. To setup a cross-listed course please contact CourseLink Support with your request at courselink@uoguelph.ca

If you require a Guelph-Humber course site, please contact your Faculty Support Officer.


Accessing the Course Creation Tool

Instructors can access the Course Creation Tool at the following url: https://cr.opened.uoguelph.ca/Instructor


Using the Course Creation Tool

Create a Course

(1) Click “Create a CourseLink course site”.

(2) Select the semester, code prefix and enter course code.

(3) Click the ‘Next’ button

The Create a CourseLink Course Site with a few options like Semester, Course Prefix, and Course Code.

Map Sections

(4) Select the check box next to the sections that you would like to add to your CourseLink site.

(5) Click the ‘Next’ button on the bottom right.

The Create a CourseLink Course Site page with Section 01 selected.
 

Course Offering Details

(6) Double check that the course offering details are correct. Add additional users here (Other instructors).

(7) If you plan on using teams an will need a security group you can click on the check box to have it setup. Please Note, It will take 24 hours after you check it off for it to become useable.

(8) Click “Create the CourseLink Course Site”

The picture describes the selected sections and it has a few options. The options in the image relate to Instruction support access, adding additional users and the deferred access condions.
A image showing the Classlist-linked Microsoft security group.


Related Resources and Programming:

Coming Soon!


Related Tools


Need More Help?

If you're still having trouble, please contact the CourseLink Support team for assistance.


Video Note

What is Video Note?

Video Note is an option available to instructors and students to create short videos of up to 30 minutes in length. Video Note is available with the following tools:

  • Announcements

  • Content

  • Discussions

  • Dropbox


How to use Video Note in Announcements

  1. Select the drop down arrow next to the Announcements tool on your course homepage (the first widget located under the course banner image).

  2. Select New Announcement.


  3. Add a title for your announcement in the Headline field.


  4. Select the Add Stuff icon


  5. Select the option for Add Video Note.


  6. You will have two options available - Record Webcam Video or Upload File (if you already have an existing video that you would like to use).


  7. If you’d like to Record Webcam Video, scroll down to where it says New Recording.

  8. Click the New Recording button to start your recording.

    Note: if this is the first time you are using the tool the browser will ask you to allow webcam permissions. Please enable this permission.


  9. Click Stop Recording when you are done with your video.


  10. Review your recording at this step. If you’d like to try again click New Recording to restart the process. If you are satisfied with the recording click Next.


  11. Add a Title and Description for your recording (optional).

    Click Next.


  12. Click Insert


  13. You should now see the recording appear under the Content section of the Announcement.


  14. Select Publish to make the video available to students.


How to use Video Note in Content

  1. Go to to Content section of your course and enter the content module you would like post in.


  2. Click the button for Upload / Create and select Create a File from the drop down.


  3. Enter a Title for your video


  4. Select the Add Stuff icon.


  5. Select the option for Add Video Note.


  6. You will have two options available - Record Webcam Video or Upload File (if you already have an existing video that you would like to use).


  7. If you’d like to Record Webcam Video, scroll down to where it says New Recording.

  8. Click the New Recording button to start your recording.

    Note: if this is the first time you are using the tool the browser will ask you to allow webcam permissions. Please enable this permission


  9. Click Stop Recording when you are done with your video.


  10. Review your recording at this step. If you’d like to try again click New Recording to restart the process. If you are satisfied with the recording click Next.


  11. Add a Title and Description for your recording (optional).

    Click Next.


  12. Click Insert.


  13. You should now see the recording appear under the Content section of the post.


  14. Select Save and Close to make the video available to students.

The upload/create button was pressed and a dropdown menu can be seen. It is highlighting in light blue "Create a File".
The Create a File page and it is highlighting in a red box the insert stuff button.
Insert stuff page with a few options. It is highlighting in a light blue Add Video Note.
The insert stuff window on the Add Video Note page. It has a black box where the video would be after clicking and selecting the upload video button.
The insert stuff window with a new recording button.
The insert stuff window with the stop recording button with a blue background.
Insert stuff button with the new recording button and next button with a blue background.
Insert Stuff window on the Add Video Note page. There is options to set the title and description.
Insert stuff window on the Add Video Note: Properties page. Can preview the post here and the blue insert button is located here.
The new announcement with a black video. The announcement title is "Announcement Title" and there is a blue publish button.
 

How to use Video Note in Discussions

  1. Go to to Discussion section of your course and enter an existing Discussion Topic you would like post in.

    .

  2. Click the button for Start a New Thread.


  3. Enter a subject for your video


  4. Select the Add Stuff button.


  5. Select the option for Add Video Note.


  6. You will have two options available - Record Webcam Video or Upload File (if you already have an existing video that you would like to use).


  7. If you’d like to Record Webcam Video, scroll down to where it says New Recording.

  8. Click the New Recording button to start your recording.

    Note: if this is the first time you are using the tool the browser will ask you to allow webcam permissions. Please enable this permission


  9. Click Stop Recording when you are done with your video.


  10. Review your recording at this step. If you’d like to try again click New Recording to restart the process. If you are satisfied with the recording click Next.


  11. Add a Title and Description for your recording (optional).

    Click Next.


  12. Click Insert.


  13. You should now see the recording appear under the Content section of the thread.


  14. Select Post to make the video available to students.


How to use Video Note in Dropbox

  1. Go to to Dropbox section of your course and either Edit an existing Folder, or create a New Folder.


  2. Enter a Name for your Dropbox folder.


  3. Select the Add Stuff button.


  4. Select the option for Add Video Note.


  5. You will have two options available - Record Webcam Video or Upload File (if you already have an existing video that you would like to use).


  6. If you’d like to Record Webcam Video, scroll down to where it says New Recording.

  7. Click the New Recording button to start your recording.

    Note: if this is the first time you are using the tool the browser will ask you to allow webcam permissions. Please enable this permission


  8. Click Stop Recording when you are done with your video.


  9. Review your recording at this step. If you’d like to try again click New Recording to restart the process. If you are satisfied with the recording click Next.


  10. Add a Title and Description for your recording (optional).

    Click Next.


  11. Click Insert.


  12. You should now see the recording appear under the Instructions section of the folder.


  13. Select Save and Close to make the video available to students.


Need More Help?

If you're still having trouble, please contact the CourseLink Support team for assistance.


Webex

What is Webex?

WebEx is an online tool designed to facilitate online meetings, online classes, student group work and other collaborative coursework.


How to Login to Webex

  1. To login into Webex, please use your browser to go to uoguelph.webex.com


  2. Click on Sign In and provide your @uoguelph.ca (or @guelphhumber.ca) e-mail address.

    This will take you to the University’s single sign-on page.


  3. Please enter your UoG username and password and click on Sign in.


  4. You are now connected to your Webex profile.

WebEx1.png
Single sign on page for the university of Guelph. Username and password is being asked for.
Your Webex Profile. This lists upcoming meetings.
 

Schedule a Class or Meeting (single or recurring)

This image shows the user scheduling a new meeting.
This image has the user setting up the recurrence of the meeting every week on Thursdays.
  1. Click on Schedule.

  2. Enter a name for your meeting in the Meeting Topic field (E.g. Biology 101)

  3. Keep meeting password unchanged or change as desired

  4. Set date and time for the session you are trying to book

    o   If this is a recurring meeting, please check the Recurrence field to open the options

  5. In the attendees list, enter names (or e-mail addresses) of students that should attend your session. 
    *If you have a list of comma (or semi-colon) separated e-mail addresses, you can copy and paste them into the field.


    *See also: Alternative Method of sending meeting to large number of participants”*

  6. Click on Save to complete the scheduling.


Start your Webex Class or Meeting

The image has the meeting time from 11:30pm - 12:30am and the start button is located to the right.
The image is asking the user to confirm their audio and video connection with a green Connect Audio and Video button at the bottom.
  1. On your webex home page, find the session you want to start under “Upcoming Meetings” meetings.

  2. Click on “View all meetings” if you can’t see the session you are looking for on the initial list.

  3. Click the “Start” button on the session you want to launch.

  4. Students are able to join your session, once you started it.

  5. When prompted, choose your audio and video preferences and then click on “connect Audio and Video”.


Start your Webex Class or Meeting

Image has the options that the host would have during the meeting like share screen.
Image shows what happens after clicking share screen button. It makes you select what you want to share.
Image shows the options the host has when sharing the screen. They can stop by clicking "Stop Sharing".
  1. To share content, click on the Share button (box with arrow pointing up)


  2. Choose what to share from the options presented


  3. After you share your screen, the control panel will move to the top of the screen and look like this


Recordings

  1. To record your session, click the Recorder button (circle with red dot)


  2. Ensure the option Record in cloud is selected before you click Record


  3. Click on the X to close the recording window.


  4. To end or pause recording, click on the recorder button again for options.

    o   Ending a meeting will also stop the recording.


  5. To access your recording, go to your Webex home page

  6. Click on Recordings on the left hand side

  7. Choose the recording of your session


  8. To edit what is available when shared, click the More button (circle with 3 dots) and select Edit. From here you can remove components of your recording, if so desired.


  9. To access the link to the recording, click on the share button on the right side


  10. Copy the link and paste to Courselink as required.

    Note: To restrict access to the recording to “UoG only”, click on “Anyone with the link can view this recording” and switch to “People in my company can view this recording

Check “advanced options” for further ways to customize your meeting (e.g. chat & participant list views)

  • Meeting Options

  • Attendee Privileges

Image has the options that the host would have during the meeting like recod meeting.
Image shows the options the host has when sharing the screen. They can stop by clicking "Stop Sharing".
Image has a Recorder window with the dropdown option Record in cloud option selected. A red Record button is at the bottom.
The image is the My Recorded Meetings.
Image show the Edit Recorded Meetings page with editing options that changes what students see from the meeting.
The image is on the Share recording options. You can enter emails to share with people and add a message. When you are ready click save

Options to consider

  • Scheduling options > Require account

  • Audio connection options > Entry and Exit tone : No tone

  • Note: if you want to allow someone to start the meeting in your absence, click the silhouette beside their name to highlight them (e.g.: your TA for the class)


Best practices

The preferences page
  • Use a headset with microphone if you are the host/presenter.

  • After the meeting is started, click on Participant > Mute on entry

  • Participant > uncheck entry & exit tone

  • Set recording preferences:


Related Tools


Need More Help?

If you're still having trouble, please contact the CourseLink Support team for assistance.


Virtual Classroom

What is the Virtual Classroom tool?

The Virtual Classroom meeting space allows instructors, trainers, and learners to engage each other with livestream video. Instructors can engage a large audience and connect up to 7 simultaneous webcams. 

Use Cases:  

  • office hours

  • training sessions

  • live lectures

Accessing the Virtual Classroom Tool

The Virtual Classroom is not one of the default links in the navigation bar of your CourseLink course site, therefore you will need to add it your navigation bar. To do so please follow the instructions provided in the Customize Navbar section.

For Distance Education (DE) courses, the link appears under the drop-down menu of the Tools link on the navigation bar (provided that the course is using Dropbox).

Location of the Dropbox link on a DE course site


Using the Virtual Classroom tool?


Click Virtual Classroom. This will take you to the Virtual Classroom page.


Within the menu, select Scheduled Meetings.

schedule meeting red button with a white plus in the middle.

SCHEDULE

Once you are on the Scheduled Meetings page, you can add a new Virtual Classroom session (Click the Plus icon in the lower right corner).

Name the meeting, then enter the date and time. If you would like the meeting to start immediately, select Now. Moderators can also enter meetings 10 minutes early to get started before others arrive.

Note: Depending on your organization’s membership, your maximum number of users may vary. You can also share up to 7 simultaneous webcams.

schedule meeting settings. It has title, timing options, cancel and save at the bottom.

Depending on your organization’s setup, you may or may not have the options highlighted in gray in the image above. If you do have these options, expand the button below to learn more.

When you are ready, click Save.

schedule meeting settings. It has title, timing options, cancel and save at the bottom.

Once the meeting is scheduled, you can invite others – as well as edit or cancel the meeting. When the meeting time arrives, you will launch the Virtual Classroom meeting

Edit or Cancel

To Edit the date/time or Cancel, click on the vertical ellipsis on the right-side of the meeting name to bring up the needed menu: 


To prepare for your Virtual Classroom meeting, learn more about the features available to you


VIRTUAL Classroom Basics


PRESENT & COMMUNICATE


SETTINGS & TROUBLESHOOTING


Tutorial Videos


Virtual Classroom FAQs


Related Resources and Programming:

Coming Soon!


Related Tools


Need More Help?

If you're still having trouble, please contact the CourseLink Support team for assistance.


Grades

What is the Grades Tool?

Use the Grades tool in your course to share grades with students for various assessments, calculate class averages, and provide feedback . You can set up a gradebook that reflects your own approach to evaluation where you can control the grading formula used to calculate grades, how grade items are associated with other tools, when grades are released to users and what information they see.

Accessing the Grades Tool

The Grades tool is one of the links found on the default navigation bar of your CourseLink course site and can be accessed directly from that link.

nav-f2f-grades.png

For Distance Education (DE) courses, the link appears under the drop-down menu of the Tools link on the navigation bar.

If you are using a custom navigation bar and the Grades link has been removed, you may re-add it. For more information on that process, please see our Navigation Bar page.

Using the Grades Tool

For the most up-to-date information on how to use the Discussions tool, please follow the links below to the Brightspace Help documentation site.

Getting started

GRADE EXEMPTIONS

MANAGING GRADES


When and why should you consider using the Grades tool? 

The Grade tool is a great way to collect and organize student grades online. There are many advantages to using the Grade tool including:

GRADING AND ASSESSMENT

Grade items represent the individual assignments, quizzes, performance measurements, etc., that you want to grade users on. Each grade item has its own entry in the grade book, which you assign a grade to for each user. Grade items can be tied to other course objects, such as quizzes or discussion forums, or they can exist independently. Grade items can be graded numerically, based on a grade scheme, or with a simple text message, depending on the grade item type chosen.

ORGANIZING GRADES

Use grade book categories to organize and group related grade items into sections. For example, you could have separate categories for Dropbox Submissions, Quizzes, Case Studies, Participation, Discussions, and so on. When grade items are grouped together in a category, you can distribute points equally across all grade items and drop the highest or lowest item in the group.

IMPORTING AND EXPORTING GRADES

You can enter grades in another application, such as Microsoft Excel, and import them into CourseLink using a CSV or TXT file. You can also create new grade items through an import file by adding a column to the file.

The import file must follow a standard format; use the Grades sample import file as a reference point. We recommend that you set up your grade book in CourseLink even if you want to enter grades in a CSV or TXT file. You can then use the Export Grades option to create an appropriately structured file.

CREATING A GRADE FORMULA

Use the Formula Editor to define a formula that calculates a grade item’s value based on other grade items. When you create a formula, you specify which grade items you want included in the formula and the relationships between them. An example of a simple formula is one that calculates the sum of a number of grade items. A more complicated formula is one that drops the minimum or maximum value from a set of grade items.

The Formula Editor is available on the New Item page and Edit Item page for Formula items, and the Edit Calculated Final Grade page and Edit Adjusted Final Grade page for the Formula grading system.

Formula examples:

Give users who achieved over 85% on all items in the category 100%.
=IF{MIN{[Week1.Percent],[Week2.Percent],[Week3.Percent]}<85,0,100}

Find the best 2 out of 3 grades.
=MAX{[G1.Points Received],[G2.Points Received]} + IF{(MAX[G2.Points Received],[G3.Points Received]} = MAX{[G1.Points Received],[G2.Points Received]}), MAX{G1.Points Received],[G3.Points Received]}, MAX{[G2.Points Received],[G3.Points Received]}}

TRACKING GRADE EVENT LOGS

Event logs maintain a record of changes made to your grade book. The logs can be useful when auditing a grade book, managing teaching assistants, and discussing grades with users.

  • User Grades Event Log records all of the changes made to a particular user’s grades.

  • Grade Item Event Log records changes to users’ grades on a single grade item.

  • Final Grade Event Log records changes to users’ final grades.

  • Manage Grades Event Log records changes made to the properties or restrictions of a specific grade item.

  • Restoring Grade Item Event Log records the date and time a grade item is created or removed, and the user who performs the action.

PREPARING FINAL GRADES

Please refer to the section on Final Grades Download Tool.

Exemptions

Category scores that include exemptions

For category scores, grade exemptions affect the scores as follows:

  • Exempted grade items are excluded from the calculation of category scores. The grade item is treated as though it does not exist within the category.

  • In a category with drop rules, exempted items are removed before the specified number of grade items are dropped. Then, the category is calculated with the remaining items.

  • If all the items in a category are exempted, there are not grade item scores to use in calculating a category score. In this case, the category does not have a score.

  • In a weighted grade book, the exemption of a category item results in the remaining item weights not reaching 100%. Brightspace automatically scales the weights of the remaining items proportionally to each other.

Calculated grade items that include exemptions

For calculated grade item scores, grade exemptions affect the scores as follows:

  • Exempted items are excluded from the calculated score.

  • If all items in a calculated grade item are exempted, the item does not have a calculated score.

Video Assignments

What is the Video Assignments tool?

The Video Assignments tool can help students develop their communication, collaboration, and critical thinking skills. There are 4 different Video Assignment types you can use within Bongo:

  • Individual Project

  • Question & Answer

  • Group Project

  • Interactive Video

Accessing the Video Assignments Tool

The Video Assignments tools is not one of the default links in the navigation bar of your CourseLink course site, therefore you will need to add it your navigation bar. To do so please follow the instructions provided in the Customize Navbar section.

For Distance Education (DE) courses, the link appears under the drop-down menu of the Tools link on the navigation bar (provided that the course is using Dropbox).

Location of the Dropbox link on a DE course site


Using the Video Assignments tool?

For the most up-to-date information on how to setup a Dropbox folder, please follow the links below to the Brightspace Help documentation site.

The image has a red arrow pointing to 3 lines in a red circle

Click Assignments. This will take you to the Assignment List page.

Select Assignment Type

Once you are on the Assignment List page, click the Plus icon in the lower right corner. 

Pick the video assignment type that best suits your desired outcomes: 

Add Assignment to Content

After creating an assignment within Brightspace, you will need to add the assignment to Content so users can see the assignment. Click Content

Content highlighted in light red

When you click on Content, the Table of Contents will display. Click on the Add Existing Activities button.


Click Add Existing Activities dropdown button is highlighted in light red

From the dropdown, select Video Assignment.


Video Assignment dropdown option highlighted in a light red

The Add Activity box will appear. To add a particular assignment to a user’s course, select the desired assignment.


Video Assignment Basics


Tutorial Videos


Video Assignments FAQs


Related Resources and Programming:

Coming Soon!


Related Tools


Need More Help?

If you're still having trouble, please contact the CourseLink Support team for assistance.


My Courses

What is the My Courses Widget?

The My Courses widget resides on the CourseLink My Home page that displays immediately after logging in and displays a list of course sites that a user has or has had access to on CourseLink. It can be used by any user with CourseLink access to to locate and access (provided the course site is currently accessible to their role) specific course sites where they have been granted access. Instructors can also use this widget to customize the course image that has been assigned to their course site.


Accessing the My Courses Widget

The My Courses widget is located on the CourseLink My Home page, which is the page a user lands on right after logging into CourseLink. Each course site to which a user has/had access to will be listed in this widget and will be represented by an image and title.


Using the My Courses Widget

Users can navigate to one of their course sites by clicking the card containing the name and image of a course offerings in this widget.

What Course Sites Are Displayed?

By default up to 12 current and upcoming course sites to which a user’s account has access will display under the All tab. This will include all courses to which a user has access, regardless of what role they have in them. It will also include resource course sites that accounts are automatically enrolled in with no end dates such as General Security Awareness, but will not include course sites that are past their closed date (i.e. course sites from a previous semester).

Locating Specific Course Sites

A user can view all of their course sites by clicking the link to View All Courses located at the bottom of the widget. This link will include a count in parentheses to indicate how many courses you have/had access to on CourseLink.

A user can also select a specific semester from the tabs along the top of the widget to see all the course sites to which you have/had access in that semester. Please note that CourseLink will remember the last selected semester the next time you access My Home/My Courses.


The All Courses Page

Clicking the View All Courses link will also take a user to a the All Courses page where they can search for a specific course via the Find a Course and Advanced Search features.

A user may use the Filter and Sort options to organize and display a custom list of their course sites.

This page also contains the same semester tabs for sorting course sites as are found on the widget.


Past courses will display the date and time access to that course site ended (i.e. Ended April 29, 2019 at 12:00 AM) and indicate that a site is closed in the bottom-left corner of the course image.

Upcoming courses will display the date and time that access to a course site will start for student-level roles (i.e. Starts September 7, 2019 at 12:00 AM).

Currently open course sites will display the end date and time for student and TA access (ie. Ends August 29, 2019 at 12:00 AM). The instructor role will allow access to closed courses.


Access to Course Sites by Role

  • Users with instructor roles in course sites are able to access them at any time, including outside of the start and end dates.

  • Users with teaching assistant roles in course sites are able to access them prior to their start dates, but not after their end dates.

  • Users with student-level roles only have access to course sites between the start and end dates.

Pinning a Course

Pinning a course keeps it on the My Courses widget, regardless of whether it is currently open or closed, which can be handy if you are frequently working on a course site that is not appearing on your My Courses widget by default.

To pin a course to your my courses widget, please follow these steps:

  1. Hover your cursor over the course icon

  2. Select the 3-dot icon that appears

  3. Select Pin

  4. The course pinned will now display in the Pinned tab

Using My Courses to customize your Course Image

The course image is what displays to students as part of the course icon under My Courses. A random stock image is inserted when the course is first created, but it can updated depending on your preference.

To change you course image, please follow these steps:

  1. Hover your cursor over the course icon

  2. Select the 3-dot icon that appears

  3. Select Change Image


Tutorial Videos


Related Tools


Need More Help?

If you're still having trouble, please contact the CourseLink Support team for assistance.


ePortfolio

What is the ePortfolio Tool?

The CourseLink ePortfolio is a personal portfolio tool for storing, organizing, reflecting on, and sharing items that represent your students' learning. They can include items such as documents, graphics, audio files, videos, presentations, and course work to demonstrate improvement or mastery in certain areas.

Students can control what items to include in their portfolio, how they are organized, and who they want to share them with. Students can share items with peers, mentors, or potential employers, and can give them permission to view items, edit items, see or add comments, and see or add assessments to receive feedback.

Accessing the ePortfolio Tool

The ePortfolio tool, unlike most other CourseLink tools, works at the organizational-level, not at the course-level. This means that the tool is available to all users across CourseLink, regardless of whether it is being used in the specific course sites to which a user has access.

Because ePortfolio is an organizational-level tool, it can be accessed from the My Home page of CourseLink, immediately after logging in.

An instructor may elect to add an additional link to the ePortfolio tool on their course navigation bar as well if they wish.


Using the ePortfolio Tool

For the most up-to-date information on how to use the ePortfolio tool, please follow the links below to the Brightspace Help documentation site.

Share items in courses

Integrating Brightspace ePortfolio with Content

Assessing Brightspace ePortfolio content in Brightspace Learning Environment


When and why should you consider using the ePortfolio tool? 

Tutorial Videos

Please note that while the videos below target learners/students, the tool can also be used by instructors in a similar capacity.


ePortfolio Tool FAQs


Related Resources and Programming:

Coming Soon!


Related Tools


Need More Help?

If you're still having trouble, please contact the CourseLink Support team for assistance.


Groups

What is the Groups Tool?

Create group work areas for users with the Groups tool. You can use Groups to organize users’ work on projects and assignments.

Users can belong to multiple groups within the same course. For example, each user can simultaneously belong to a group for class projects, a group for special interest discussions, and a group for advanced users. Each group can have its own Discussion forums, Dropbox folders, and Locker area to work in. You can grade members of groups individually or as a team.

Accessing the Groups Tool

The Groups tool is one of the links found on the default navigation bar of your CourseLink course site and can be accessed directly from that link.

For Distance Education (DE) courses, the Groups link appears under the drop-down menu of the Tools link on the navigation bar (provided that the course is using Groups).


Using the Groups Tool

For the most up-to-date information on how to use the Groups tool, please follow the links below to the Brightspace Help documentation site.

Working with Groups

Groups and Discussions


groups vs. Sections

If you want users to see all users and content for a course but be a part of a group for a specific project or activity, use the Groups tool. However, if you want users to only see learning materials and users from their own section, use can use the pre-populated sections included in your course site. Those sections reflect the section enrolments sent to CourseLink from the Registrar’s Office and are updated daily.

To organize users' work on projects and assignments or to create special work areas for users with different learning needs, use the Groups tool.

Additional Groups Tool Tips

  • Users can belong to multiple groups within the same course

  • For each group, you can create separate discussion forums, Dropbox folders, and Locker areas to work in

  • Note that the grade assigned via a group Dropbox folder will cascade to all group members, but that grade can be adjusted individually via the Enter Grades page after it is transferred

  • Before setting up groups, consider how you want to organize them. The following factors can affect how users enroll in groups:

    • Setting groups up before or after you've enrolled users

    • Enabling auto-enrollment in groups

    • Enabling randomization of users in groups

    • Enabling self-enrollment in groups

    • The Enrollment Type you choose

  • When possible, try to set up groups after the majority of users enrol in your course. This gives you a better idea of how many users you are organizing and how many groups you need. Setting up groups after enrollment can also ensure better distribution of users between groups.

  • For users to enroll in groups automatically, the can be auto enrolled into groups permission must be enabled. Contact your site administrator if you experience difficulties.

  • When using self-enrolment groups, please note that students will not be able to remove themselves from a group once they have selected it, but the instructor or TA can remove them from the group allowing them to re-enrol in a new group


When and why should you consider using the Groups tool? 

The Groups tool in CourseLink is a powerful feature for managing students and facilitating collaborative learning. You should consider using it in the following scenarios:

Group Assignments and Projects

  • When: You want students to work together on assignments, projects, or presentations.

  • Why: The Groups tool enables you to organize students into teams and assign group-specific tasks. Each group can have its own dedicated workspace, including discussion boards, file sharing, and group Dropbox folders, making it easier to manage submissions and interactions.

Discussion-Based Collaboration

  • When: You want students to engage in smaller, focused discussions.

  • Why: Smaller groups allow for deeper interaction, encourage participation, and help shy students feel more comfortable contributing. The Groups tool can automatically create private discussion areas for each group.

Benefits of the Groups Tool:

  • Flexibility: You can create groups manually or allow D2L to auto-enroll students.

  • Integration: Groups integrate with other D2L tools like Assignments, Discussions, and Quizzes.

  • Efficiency: Streamlines managing group activities and tracking progress.

Using the Groups tool helps create a more organized, collaborative, and engaging learning environment, particularly for courses with diverse interaction and teamwork needs.

Tutorial Videos


Groups Tool FAQs


Related Resources and Programming:

Coming Soon!


Need More Help?

If you're still having trouble, please contact the CourseLink Support team for assistance.


Classlist

What is the Classlist Tool?

Use the Classlist tool to view who’s enrolled in your course, check users’ online statuses, send email messages, view shared locker files, and read their blogs if they have one.

Depending on your permissions, the Classlist tool enables you to add or remove course participants, change user roles, create new users, and import users from a TXT or CSV file. You can also use the options in the context menu beside each user’s name to view user progress and view group enrollments.

Accessing the Classlist Tool

The Classlist link can be found within the Course Admin link on the navigation bar.


Using the Classlist Tool

For the most up-to-date information on how to use the Classlist tool, please follow the links below to the Brightspace Help documentation site.

The Classlist tool is a convenient starting point for viewing information about the users in your course site. For example, you can check who’s online, view profiles, and check group enrollment.

You can also view the Enrollment Statistics, which provides a summary of course enrollments and withdrawals, as well as access the User Progress tool.

Below you will find some additional useful information about the Classlist tool pertaining to User Progress, Enrolment Statistics, and Class Engagement.

Bulk Enrol

Steps to bulk enrol users:

  1. Please navigate to the classlist.

  2. Click “Add Participants”

  3. Click in the dropdown “Import user form a file on your computer”

    i.File format is *Username, *Role, *Section

  4. Choose a file and click import

Viewing User Progress

Use this feature to view the progress of users enrolled in your courses. For more information on User Progress, see User Progress.

  1. On the Classlist page, click View Progress from the context menu (down-facing arrow) of the user you want to view

  2. To view progress on a specific progress indicator, click the indicator from the Reports List and the report will display under Report Details

  3. Click the expandable and collapsible links to expand or collapse the report detail


Viewing Classlist enrollment statistics

The Enrollment Statistics area provides a summary of course enrollments and withdrawals.

On the Classlist page, press the Enrolment Statistics button.


Class Engagement

The Class Engagement tool provides instructors with a quick overview of how engaged their students are with CourseLink. The tool helps instructors identify students who may be at risk, but it is not fool-proof. While it can inform an instructor who has or has not accessed their site or posted in discussions, it cannot inform an instructor how long a student spent on their site when it was accessed or what the quality of their discussion contribution may have been. This will still require a human eye and informed analysis.

To launch the Class Engagement tool, click Classlist on your navigation bar (or from Course Admin), then click the Class Engagement button.

 
  • To alert instructors about low class engagement, a notification tile indicates the number of learners who have not visited the course in the last 7 days. Clicking the tile filters the class list to display the learners who have not accessed the course during this period of time.

  • To view course progress at a glance, a bar chart tile displays the grade distribution within the course, with each bar representing a grade range. Clicking a bar filters the class list to display the learners in that grade range. To dismiss the filter, click Clear. NOTE: Since most course sites grade systems are set to automatically score empty grades as zero, the grades displayed are not reflective of their overall grade in the course to date, but rather of their current final grade.

  • Clear visual indicators display when filters are applied to metrics. For example, clicking a range in the grade distribution tile displays the Current grade filter with the specified grade range. Instructors can dismiss an active filter they are no longer interested in by clicking X in the filter.
    If multiple, discontinuous grade ranges are selected in the grade distribution tile, the Current grade filter displays without a grade range.

  • Use the search bar to filter the class list by learner name. You can type a name, user ID, or learner number.

  • A class list in table format displays the following information for each enrolled learner:

    • Name (full name and CourseLink username)

    • Current grade

    • Last visited (date of the last course visit)

    • Discussions (indicates the number of threads started by each user and the number of replies posted by each user)

  • Clicking a table entry displays more information in the Class Progress tool. For example, clicking a user’s name displays the Progress Summary in the Class Progress tool, which provides detailed information about course progress using tracking indicators such as quizzes, surveys, and login history


Email Classlist

  1. Select the Email Classlist button.

  2. Select the tab for the type of user that you would like to send the email
    to (either All, Students, Instructors, Teaching Assistants, or Guests).

  3. Click the Send Email button at the bottom of the page.

  4. A pop-up menu will appear where you can draft your email. The users
    selected in the previous step will be listed as Bcc recipients by default.

Image show the classlist with the Email Classlist option in a red box

5. Enter a title in the Subject line and add your email text under the Body section.

6. There is a an option to upload Attachments below the the Body section. Note that file sizes are limited to 10 MB.

7. Once you are ready to send your email, scroll back up to the top and click the Send button.


Classlist – View user pronouns next to names to further personalize learning

Classlist can now display users’ pronouns next to their names.

Users can choose whether to display their pronouns to other users in the Account Settings > Pronouns menu. They must check the Allow others to see my pronouns check box for their pronouns to display in Classlist.

Previously, the only location where pronouns displayed was in a user’s profile card.

When pronouns can be found in the classlist. It is to the right of the students name in a red box.

Classlist – Easily access and view sections for specific users

Instructors can now use the Classlist tool to view groups and sections. Previously, instructors could only view section enrollments using various filtering and sorting work flows or by searching within the Sections tool.

The view groups and sections dropbown option in a red box
 

Tutorial Videos


Classlist Tool FAQs


Related Resources and Programming:

Coming Soon!


Related Tools


Need More Help?

If you're still having trouble, please contact the CourseLink Support team for assistance.


Account Settings

What are Account Settings?

Account Settings allow you to customize and manage your personal CourseLink preferences such as your online status, CourseLink’s appearance, accessibility options, language and region, Discussions settings, and Email options.

Accessing your Account Settings

You can access your Account Settings by following the steps below:

  1. Click your name from the top-right of the CourseLink minibar

  2. Select Account Settings from the menu

  3. Use the tabs across the top of the page to view and edit options for your Account Settings, Discussions, and Email


Account Settings Options

Font Settings

Adjusting the font face and font size changes how the default font and size of text displays for the user. It does not affect images, documents, and other objects such as math equations.

Dialog Setting

The Show secondary window as options enable you to set secondary windows as pop-ups instead of dialog boxes. This setting helps screen readers and other assistive technologies separate the content of the secondary window from the main window. If you are using assistive technology such as a screen reader, we strongly recommend showing secondary windows as pop-ups.

HTML Editor Settings

Under this tab you can turn off the rich text editor. The HTML Editor has many additional rich text features that might be difficult to navigate with assistive technology. This option simplifies pages that have text fields, while still allowing you to include HTML content.

Video Settings

Select Optimize video presentation for programmatically-driven assistive technologies if you use assistive technology, such as a screen reader, to navigate the web. This option ensures that your assistive technology can detect embedded videos; it does not affect the accessibility of specific video players.

Locale & Language

Preferred Locale and Language:
Sets which locale to use for screen orientation, text, and graphics in the system. The options in the drop-down list correspond to the locale options available at your institution. Administrative staff and course designers can override your preferences for specific pages and courses.

Clock:
Sets whether time displays in 24-hour or 12-hour clock format.

First Day of the Week:
Sets which day appears first in your calendar.

Date:
Sets the display format of dates in the system.

Number Format:
Sets the display format of numbers in the system.

Percentage Format:
Sets the display format of percentages in the system.

Time Zone

Sets all dates that include times in CourseLink to correspond with the time zone you specify.

Signing In

Online Status sets whether you appear offline or online to other users when you are logged into the system.

Application Settings

Some applications (integrations) registered to your account can access the CourseLink LMS on your behalf. These setting allow you to manage and revoke that access.

For applications using OAuth 2.0, click the Manage applications registered with OAuth 2.0 link to view and control access from those applications.

For applications using ID Key Authorization, click the Revoke Access button to force all your applications or devices to renew their authentication. This ensures that others cannot, for example, access your grades or send emails as you if you lose a mobile device or discover that a linked application is compromised.


Account Settings - Discussions

Personal Settings

These settings will affect the default options for your account on CourseLink when interacting with the Discussions tool.

Display Settings

  • Always show the Discussions List pane

    • Selecting this option will pin the Discussions List pane in the View Topic and View Thread pages.

  • Display deleted posts

    • Selecting this option displays deleted posts when browsing topics. Note that the student role can only see their own deleted posts. An instructor role can see both their students’ deleted posts and their own deleted posts.

Both options are enabled by default.

Reply Settings

  • Include original post in reply

    • Selecting this option includes the original post by default when composing a reply.

This option is enabled by default.

Subscription Settings

  • When creating a new thread, subscribe to the thread by default

    • You will receive notifications when users reply to your thread based on your notification settings

This option is enabled by default.

Org Unit Settings

Default Rating Scheme

The option selected will automatically display in the Rate Posts drop-down list on the New Topic page and will automatically apply to imported course components. This setting only applies to users with roles that allow them to create new discussions topics (Instructors, TAs and Administrators).

Options include:

  • No Ratings

  • Five Star Rating Scheme

  • Up Vote/Down Vote Rating Scheme

  • Up Vote Only Rating Scheme

The default option is set to No Ratings. Any of these options may be selected at the time of creating a new discussion topic, regardless of which default setting is selected.


Account Settings - Email

Email Options

Send a copy of each outgoing message to [specified email address]

Sends a copy of all the emails you send to a specified address. Click the Change email address link to specify the address to which you want to send copies. Changing this address will change your external address for all mail sent from the Desire2Learn application.

Save a copy of each outgoing message to the Sent Mail folder

Saves a copy of your sent messages to a folder for convenient record-keeping.

display Options

Show external email addresses in the Address Book

External addresses for your system contacts will appear in the Address Book.


Account Setting - Set and view user pronouns

Users can now set their pronouns through Account Settings.

The account setting page highlighting the pronouns options

Figure: The area under Account Settings, where you can set your pronouns.

image displays a users profile card with the pronouns displayed.

Figure: A user profile card with the pronouns displayed.

Tutorial Videos


Account Settings FAQs


Related Resources and Programming

Coming soon!


Need More Help?

If you're still having trouble, please contact the CourseLink Support team for assistance.


Import / Export / Copy Components

What is the Import/Export/Copy Components tool?

The Import/Export/Copy Components tool lets you copy quizzes, content, grade items, discussion forums, assignments folders, and nearly every other type of component from another course or package. Copying components saves you from having to recreate your course materials and can significantly reduce the amount of work required to create or re-offer a course.

You can use the Import/Export/Copy Components tool to:

  • Reuse components from your previous course offerings.

  • Import material from an external source (other learning management systems, publisher resources, etc.)

  • Export materials in your course for use outside of CourseLink.

  • Copy components created by your peers into your own course offering.


Accessing the Import/Export/Copy Components tool

The Import/Export/Copy Components tool can be accessed by users with the Instruct-build-grade role (typically instructors of course sites supporting face-to-face course offerings) by following the steps below:

  1. Access the course site to which you you want to copy course components

  2. Click Course Admin on the navigation bar

  3. Select the Import/Export/Copy Components tool (if you have categories enabled, it will appear under the Site Resources heading)


Using the Import/Export/Copy Components tool

For the most up-to-date information on how to use the Import/Export/Copy Components tool, please see the following links to the Brightspace help documentation site:


Important Notes

  • This tool is only available to course instructors with the Instruct-build-grade role (typically those who are teaching courses that are delivered face-to-face)

  • Users will only be able to copy components from course sites where they also had the instruct-build-grade, or instruct-copy role

  • If you require access to another instructor’s course site to copy their components, please contact them directly and request that you be added to their site with the Instruct-copy role (CourseLink Support cannot grant you access to another instructor’s course site)

When and why to use Import/Export/Copy Components?

The import/Export/Copy Components tool can save instructors considerable time in a number of different scenarios.

Quickly setting up course sites for courses you’ve taught previously

If you teach a course where the content, assessment and delivery doesn’t change much from one semester to the next, then your entire course site can be setup in a matter of minutes by copying the content (lecture slides, reading materials, etc.), tools (Dropbox, Quizzes, Discussions, etc.), and assessment setup (Grades, Rubrics, etc).

During the copy process you can also use the Offset Dates feature to move all your previous due dates and release dates ahead a set number of days to save even more time!

Teaching a course that was taught by another instructor previously

If you’re teaching a course that was previously taught by another instructor and you are planning to use all or some of the same setup that they had previously, you may be able to get a head start by copying components from their site to yours.

Please keep in mind that a course site’s content and setup is considered the property of the instructor(s) who taught the course; you will need to contact them and request to be added to their site via the Classlist with the Instruct-copy role to be able to see their site as an option when copying components.

NOTE: If the previous instructor cannot be reached, CourseLink Support can grant that access with your department Chair’s direct consent.

import packages from publishers and vendors

Often a publisher or vendor you are working with will provide access to packages of content, quizzes or quiz questions that are compatible with a learning management system like CourseLink. It’s always a good idea to see if they have any Brightspace/D2L compatible packages available for download that could then be copied into your course site via the Import Components option.

Taking your course to go

If you are moving to another institution that is using a compatible learning management system, you can use the export option to download a copy of most of your course site’s components in a package that can be imported to the learning management system at your new institution. This works best when the other institution is also using the D2L Birhgtspace LMS, however it will also work to some degree with some other compatible learning management systems.

Tutorial Videos


Import/Export/Copy Components FAQs


Related Resources and Programming

Coming soon!


Related Tools

  • Turnitin

  • Grades

  • Rubrics

  • Groups

  • Content


Need More Help?

If you're still having trouble, please contact the CourseLink Support team for assistance.


I-CL-ContentOwen Wooding
Announcements

What is the Announcements tool?

The Announcement tool enables you to create news items that help communicate course updates, changes, and new information to your users quickly and effectively. Since Course Home is the first page that users often see when they log in or access their courses, the Announcement widget is a good area for displaying important information.

Announcement items appear in the Announcement widget, but CourseLink users can also receive instant notifications about postings through email and SMS (text messages). Please note that students do have the ability to turn off their announcement notifications as well as block them from specific course sites.

Accessing the Announcements Tool

The announcements tool is available via a widget on the default course home page of a CourseLink site. The options can be accessed from the widget using the context menu (down-facing arrow) to the right of the title.


It can also be accessed via the Course Admin link from a course navigation bar by following the steps below:

  1. Access the course site

  2. Select Course Admin on the navigation bar

  3. Select Announcements (if the tools are sorted by category, Announcements will appear under the Communication heading)


Using the Announcements tool

For the most up-to-date information on how to use the Announcement widget, please see the the following links on the Brightspace help documentation site.


When and why is it a good idea to use the Announcements tool?

The announcements tool is a great way to communicate and engage with students outside of class time.

That said, it is important to remember that students will only see an announcement if they access your course site or if they have opted to receive notifications via email or text, so it is best not to rely on the tool for any communication that all students should receive in a timely fashion. For communications such as that, it would be best to email the entire class via the Classlist tool.

Be careful not to over-use the announcements tool. Students accounts in CourseLink are set to receive email notifications for new announcements from all their course sites by default. If you are posting multiple announcements several times a day, students may become frustrated by the volume of emails and block your course site from their notifications reducing the likelihood that they will see your announcement.

Reminders

Throughout the semester it can be beneficial to post announcements concerning important dates such as assignment due dates, lab times, meeting locations for excursions, etc.

EncouragemenT and Directed Study

An announcement can be a great way to let the class know when you are impressed by their work. Similarly if after grading an assignment or seeing the results of a quiz you notice that the majority of the class is struggling with a specific concept or theory, an announcement can be a great way to direct students to supplemental materials to reinforce those concepts.

Making Connections with Relevant Current Events

In some disciplines current events can often intersect nicely with course materials and provide students with a real world example of how the material they are studying can be applied in real world situation. Creating an announcement to provide some context as well as a link to a news article or video can be a great way to engage students and encourage critical thinking.

Tutorial Videos


Announcements FAQs


Related Resources and Programming

Coming soon!


Related Tools

  • Turnitin

  • Grades

  • Rubrics

  • Groups

  • Content


Need More Help?

If you're still having trouble, please contact the CourseLink Support team for assistance.


Dropbox

What is the Dropbox tool?

Students use the Dropbox tool to upload and submit assignments to the Dropbox submission folders in CourseLink, eliminating the need to mail, fax, or email their work to instructors.

Instructors use the Dropbox tool to see students’ submission times, download Dropbox submission folders to their computer, view submissions on the Evaluate Submission page, associate Dropbox submission folders to grade items/rubrics, and return submissions with grades and feedback.

In the Folder Submissions area, instructors can view students' submissions and submission dates, eliminating the need to collect assignments and making it easy to track when files were submitted.

Instructors can create categories to group and organize assignment submission folders. They can also restrict access to assignment submission folders by date and time, group membership, or use special access permissions.

Accessing the Dropbox Tool

The Dropbox tool is one of the links found on the default navigation bar of your CourseLink course site and can be accessed directly from that link.

Location of the Dropbox link on a face-to-face course site

For Distance Education (DE) courses, the link appears under the drop-down menu of the Tools link on the navigation bar (provided that the course is using Dropbox).

Location of the Dropbox link on a DE course site


New Experience Using the Dropbox

The main panel on the left allows instructors to add a name, score out of, due date, instructions, and attachments.

The panel on the right allows instructors to organizes more advanced options. This includes start and end dates, rubrics, annotation tools, and Turnitin. When these options are collapsed, summary text provides details about which settings are active and subtle hints that aid in the discovery of additional settings. 

The new experience automatically syncs the Dropbox assignments including the name and score to the gradebook. If you create grade items in advance, support for selecting existing grades and categories is also available.

Note: To select the existing Grades column in the Dropbox, you must enter a score in the Score Out Of text field.

Instructors are temporarily able to opt in and out of the new experience based on preference.

Screen Shot 2020-07-17 at 4.50.19 PM.png

Using the Dropbox tool?

For the most up-to-date information on how to setup a Dropbox folder, please follow the links below to the Brightspace Help documentation site.

Please note that the documentation on the Brightspace Help site refers to the Dropbox tool as Assignments, however CourseLink still uses the original name of the tool (Dropbox). They are the same tool.
— CourseLink Support
 

When and why is it a good idea to use the Dropbox tool?

The Dropbox tool is a great way to collect student assignments online. There are many advantages to using Dropbox for assignment collection, including:

Access Control and Submission Tracking

The ability to restrict access via start, end, and due dates

Grading and Assessment

Each Dropbox folder will allow a TA or instructor to assign a grade to a students work either as a simple score, or when a rubric is attached, a score as well as the completed rubric will be available to the student once published. That grade and the corresponding feedback will automatically transfer to the student’s corresponding grade item when published.

When working with group submissions, all members

Integration with Turnitin

Similarity checking and digital markup

Providing Feedback

When grading student submissions to a Dropbox folder, an instructor or TA will be able to leave feedback via text, file attachments, audio recording, or video recording. This feedback becomes available to the student as soon as their grade is published via the Dropbox and the corresponding grade item (if linked).

Restricted Files

These are the file types that are restricted from being submitted to the dropbox.

Discussions

What is the Discussions Tool?

Use the Discussions tool in your course to encourage students to share thoughts on course material with their peers. You can set up forums and topics for students to ask questions, discuss course content and assignments, and work together in assigned groups.

Accessing the Discussions Tool

The Discussions tool is one of the links found on the default navigation bar of your CourseLink course site and can be accessed directly from that link.

Location of the discussions link on a face-to-face course site

For Distance Education (DE) courses, the link appears under the drop-down menu of the Tools link on the navigation bar (provided that the course is using Dropbox).

If you are using a custom navigation bar and the Discussions link has been removed, you may re-add it. For more information on that process, please see our Navigation Bar page.

New Discussions Experience: Creating an open topic

The default setting for a topic is “open”.

Although the message under Group and Section Restrictions says, “Only selected groups or sections can view this topic”, as long as you don’t restrict the topics to specific groups, it will remain open for all students. This is a somewhat confusing message.

Location of Manage Restrictions button highlighted on the discussion topic settings.

You can verify that the discussion topics are open to all students by reviewing the Group and Section Restrictions and confirming that “Restrict topic” is selected (confusing language) and none of the options below are selected.

The Group and Section Restrictions for a discussion topic. The select who will see this topic area is highlighted and none of the options are selected.

Create a Group Discussion:

To connect groups to a discussion topic in CourseLink, follow these steps:

  1. Navigate to Discussions in the navbar.

  2. Create a Discussion Forum:

    • If you don’t already have a forum, click "New Forum" and give it a title (e.g., "Group Discussions").

    • Save the forum.

  3. Create a Discussion Topic:

    • Within the forum, click "New Topic."

    • Choose the forum you just created.

    • Enter a Title and Description for the topic.

  4. Restrict to Groups:

    • Under "Availability Dates & Conditions" click on “Manage Restrictions” under "Group or Section Topic."

    • Select “Restrict topic and separate the threads” as users in the selected groups/sections can view this topic but will only see threads from their group/section.

    • From the dropdown menu, choose the Group Category you created earlier.

  5. Set Additional Options:

    • Configure settings like availability dates, grading, and assessment options as needed.

    • Click "Save and Close."