Instructors: CourseLink Tools

The information on this page is intended for instructors using a CourseLink course site.

Posts in I-CL-Assessment
Accommodations Tool

This feature enables instructors to grant learners accommodations through the Classlist tool. The Accommodation options currently available include: more time to complete quizzes at the course level and the ability to bypass right-click restrictions in quizzes. The right-click restriction in quizzes is the ability for learners to right-click in the quiz while taking the quiz and is important for users that may need access to accessibility tools like screen readers.

Please note: this tool has been enabled for the Guelph-Humber campus. Although University of Guelph users can use it, the Automated Quiz Extension Tool is the recommended tool for U of G students.

Figure: The new Edit Accommodations dialog box. It has setting allowing to modify the time limit.

Figure: The new Edit Accommodations dialog box


How it works:

Once granted, these accommodations apply to all quiz activities in a course for that learner. The additional time can be applied in terms of quiz time multipliers (for example, 1.5x quiz time) or extra time in minutes (for example, an additional 30 minutes) on every quiz in a course.

An icon appears next to the learner’s name in the Classlist to indicate that the learner has an accommodation.

Instructors can filter the Classlist by Accommodations using the advanced search options.

For learners - an icon appears next to learners’ own names to indicate they have an accommodation. To view accommodation details, learners can click My Accommodations from their learner context menu.

Quiz-specific special access can overwrite an accommodation for any user on a quiz-by-quiz basis. When you overwrite an accommodation using Special Access and then click Save, a warning describing the impact of overwriting an accommodation appears.


Steps to Add:

  1. Navigate to the Classlist in Course Admin.

  2. Locate the student you wish to provide accommodations for.

  3. Click the arrow to the right of their name.

  4. In the dropdown menu, select Edit Accommodations.

  5. Select “Modify Time Limit”

  6. Put their modifer in and click “Save”

The edit Accommodations button underlined with a red line


Need More Help?

If you're still having trouble, please contact the CourseLink Support team for assistance.


Hiding Exam Grades

Publishing Midterm and Final Exam grades when you want the results hidden from students

You can publish quiz grades to the Grades page without students receiving their mark or feedback. We’ll use a Final Exam quiz as the example below, but the same principle can be applied to any quiz, midterm, or Dropbox assignment.

First, hide the corresponding grade item so students will not see their grade in the Grades page. Navigate to Grades. Click the dropdown arrow beside the corresponding Final Exam grade item and select “Hide from Users".

Check the Submission Views tab to ensure students will not see their marks on the Quizzes page. Navigate to Quizzes. Click the Final Exam quiz to edit. Navigate to Submission Views. Click the “Default View” link. Under View Details, ensure the checkbox beside “Show attempt score and overall attempt score” is unchecked. Save to return to the Submission Views tab, then Save and Close.

Check the Assessment tab of the quiz to verify that the Grade Item is selected and Auto Export to Grades is selected.

Now, you can safely publish the grades without students seeing their mark. Navigate to Quizzes. Click the dropdown arrow beside the Final Exam quiz and choose “Grade”. Ensure that you have the maximum number of users displayed per page by selecting “200 per page” at the bottom right. Use the checkbox at the top-left of the grid to select all students and exam attempts. Click “Publish Feedback”. It is safe to ignore the warning message “Users will receive feedback on publishing. Do you want to continue?” if you have followed the steps above. Click “Yes”. Your grades have now been sent to the Grades page without students seeing their mark. If you have multiple pages of students in your class (200+), repeat these steps for each page of students.

Troubleshooting

If the above steps do not cause the quiz grades to be sent to the Grades page, the Quiz is likely not connected to a corresponding grade item. Navigate to Quizzes and click the Final Exam quiz to edit. Choose the Assessment tab. From the Grade Item dropdown menu, choose the grade item that corresponds with the Final Exam. If no grade item exists, proceed to the Grades tool to create and hide the quiz column.

Getting started

MANAGING GRADES

PREPARING FINAL GRADES

Please refer to the section on Final Grades Download Tool.

Automated Quiz Extension Tool

OpenEd, in partnership with SAS, has developed an automated quiz extension tool that will automatically apply a quiz extension using Special Access in quizzes for students registered with SAS.

Please Note: Guelph-Humber courses should use the Accommodations tool. The Automated Quiz Extension Tool is only available for students registered with SAS.

Instructor or TA Responsibilities:

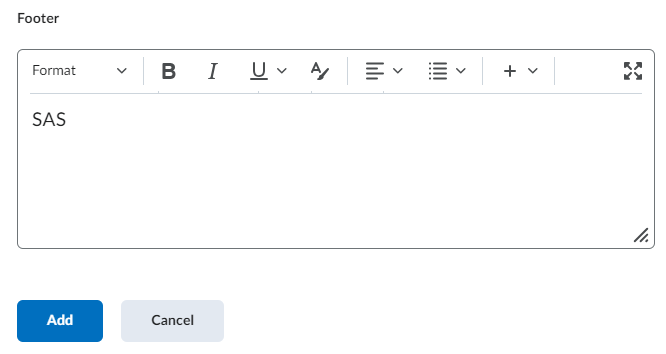
To enable the Automated Quiz Extension Tool, instructors or TAs must add the word SAS to the Page Footer located under the Timing and Display tab of each quiz. Once the quiz is saved with this change, it will be enabled for automated SAS quiz extensions.

That’s it!

A text field with SAS written in it
The Footer can be found in the Manage Header and Footer settings under the Timing and Display dropdown when using the new quiz experience.

The Footer can be found in the Manage Header and Footer settings under the Timing and Display dropdown when using the new quiz experience.


How it works:

When the word SAS is added to the quiz footer, the automated tool will flag the quiz as being enabled for any quiz extensions in that course site.

A daily feed from SAS, containing the most up-to-date list of SAS student extensions, syncs with CourseLink in the evening (at approximately 10:00 PM) and applies the required special access conditions to any quizzes in a course site that is flagged as enabled.

If you enable a quiz during the day, the feed will update those quizzes during the evening sync.

Any students with straight time added (+15 or +30 minutes) will only have the time applied if the original enforced time on a quiz is 30 minutes or more. Straight time is used to provide the student with enough time to take medications, eat something, or other reasons depending on the medical condition.

Any multipliers (1.5x or 2.0x) will apply regardless of enforced time.


Why not do it automatically for all quizzes?

There are several reasons:

  1. Flexibility

  2. Instructor discretion

  3. Universal design

We hope that this simplified method of adding the word SAS only once to each quiz far outweighs the previous method that required each individual SAS student’s special access condition to be set in each quiz in each course site.


Manually Adding or Adjusting Special Access Dates:

If you are granting or adjusting special access in a quiz for a student with SAS conditions that differ from the regular quiz dates, your changes will not be overwritten. Please be aware that the sync will retain the adjusted dates on any special access records that have been manually adjusted by the instructor or TA, including the records that already exist in the system. The instructor or TA is responsible for maintaining those conditions going forward.


Automatically Adjusting Late Evening Start Times:

Students writing late evening quizzes that will potentially take them past 10:00 PM will have the start time automatically adjusted forward to ensure that the students finish writing the quiz by 10:00 PM.

For example, if a student has a 2.0x extension on a 2 hour exam and the quiz starts at 7:OO PM, the tool will adjust the start time to 6:00 PM to ensure the entire 4 hour time limit can be completed by 10:00 PM.


Deferred Exams:

The tool sync will only update in the current semester. Any students with SAS accommodations for deferred exams from previous semesters must be added manually in the previous course using Special Access in the quiz.


Please Note: Guelph-Humber courses should use the Accommodations tool.


Need More Help?

If you're still having trouble, please contact the CourseLink Support team for assistance.


Class Progress
 

Track Course Progress

The Class Progress tool tracks your learners' overall progress as a course and individually.

You may want to use the Class Progress tool to do any of the following:

  • Monitor progress for any or all users in your course

  • Prepare progress reports

  • View user profiles, email users, or instant message users

  • Track when a user accesses the course and downloads course content

  • Track a user's grades, completion of learning objectives, access of content topics, participation in discussions, assignment submissions, quiz submissions, checklist completion, survey responses, and login history

  • Set up intelligent Agents for learners who are falling behind in a course

  • View feedback and submissions for assignments, discussion topics, and other assessments for individual learners

For content, the content must meet three criteria to be included in the learner's progress:

  • The learner must have access to the content

  • The content must be marked with a completion method of Required Automatic or Required Manual

  • The content is not exempt

When content does not meet these conditions, the topics are not included in the calculation of the learner’s progress.

Class Progress

From Course Admin, click Class Progress.

Overview of the Class Progress page. It has 4 orange circles with numbers 1-4 in them which relates to the text below the image.

1) You can filter class participants based on membership in groups or sections.

2) Use the Class Progress navbar to sort the order in which users appear in the chart. By default, the following performance indicators appear from left to right in the navbar: Content CompletedObjectivesLogins, and Grades. A maximum of 4 performance indicators can display at any time on the Class Progress page. Available indicators include: Content CompletedObjectivesDropbox SubmissionsGradesChecklist CompletionContent VisitedDiscussion ParticipationLogin HistoryQuiz Performance, and Survey completion. To change which indicators are displayed and which order they are displayed in, click Settings.

Note the following:

  • Login History indicates when the learner logged into Brightspace Learning Environment, not the course. However, Course Logins displays in each learner's User Progress report, which reports on when they accessed the course.

  • Absent period indicates the number of days since the learner last logged into Brightspace Learning Environment. For example, if "Oct 30, 2017 - absent period: 3" displays, the learner did not log in for 3 days, and an Oct 26 login displays below the Oct 30 login.

3) All course participants appear in the chart. Their name, username, and Org Defined ID display alongside their profile picture, if supplied. Their performance results for the listed indicators also display in the chart. Clicking on any area of this chart brings you to the individual user's User Progress page.

4) To adjust which performance indicators display by default, click Settings. You can also search for users by typing in the Search users field.

Tutorial Videos


Content Tool FAQs


Related Tools


Need More Help?

If you're still having trouble, please contact the CourseLink Support team for assistance.


Rubrics

What is the Rubrics Tool?

Rubrics are an assessment tool used to evaluate an activity or item based on a predefined set of criteria. They help ensure that activities and items are evaluated fairly and consistently.

Accessing the Rubrics Tool

  1. Click Course Admin on the navigation bar

  2. Select the Rubrics tool (if you have categories enabled, it will appear under the Site Resources heading)

Location of the Course Admin link on a face-to-face course site

Location of the Rubrics tool under Course Admin - Assessment with a red box and a red arrow pointing to it

Location of the Rubrics tool under Course Admin - Assessment


Using the Rubrics Tool

For the most up-to-date information on how to use the Rubrics tool, please follow the links below to the Brightspace Help documentation site.


When and why should you consider using the Rubrics tool? 

Rubrics allow you to grade assignments fairly and consistently; especially when multiple users are performing the evaluation. It allows students to understand the criteria that they are being graded against, and how they are fairing.

Setting up a rubric can improve the rate you can evaluate work by, provide consistent and accurate scoring and feedback - especially in large classes, or where students complete multiple assignments that will be marked to the same criteria.


Tutorial Videos


Rubric Tool FAQs


Related Resources and Programming:

Coming Soon!


Need More Help?

If you're still having trouble, please contact the CourseLink Support team for assistance.


Quizzes

What is the Quizzes Tool?

The Quizzes tool enables you to create and manage points-measured assessments. As part of your quantifiable assessment procedures, you can use quizzes to help evaluate users’ learning progress and learning outcomes. Quizzes also provide users with feedback on their learning progress. Users can take a quiz, review their quiz results, and see class statistics for a quiz.

Create and manage quiz questions from the Question Library or the Quizzes tool, and organize quizzes into categories to make it easier to find assessments with similar or related content. Use the quiz preview option to test the accuracy of content and grading before you release a quiz. In a preview, you can answer the questions, view allowed hints, submit the quiz, auto-grade answers, read feedback, and view report results.

You can also view quiz statistics such as grade distribution, grade average, question statistics, and user statistics on the Statistics page for completed quizzes.

Accessing the Quizzes Tool

The Quizzes tool is not one of the links found on the default navigation bar of your in-class CourseLink course site. The Quizzes tool will need to be Added to your Navbar.

For Distance Education (DE) courses, the Quizzes link appears under the drop-down menu of the Tools link on the navigation bar (provided that the course is using Quizzes).


Set up Timing & Display

You can create a time limit for your quiz and set up how the quiz displays to learners.

To set a time limit

To set a time limit and enter the length of time for the quiz:

  1. From the New Quiz page, click to expand the Timing & Display drop-down menu.

  2. Select Set time limit.

  3. In the Time Limit field, specify the length of time for the quiz in minutes.

  4. Click Timer Settings and do one of the following.

    • If you want to automatically submit the quiz when the time limit is exceeded, select Automatically submit quiz attempt. *Please note that submitted attempts cannot be reopened.

    • If you want learners to be able to continue working after the time limit, select Flag as time limit exceeded and allow the learner to continue working.

    • If you do not want to enforce the time limit, select Do nothing: the time limit is not enforced.

  5. If you have completed customizing your quiz, click Save and Close.

Setting up a synchronous quiz in the New Quiz Experience

  1. On the navbar, click Quizzes.

  2. On the Manage Quizzes tab, click New Quiz or one of the quizzes you would like to edit.

  3. On the Quiz Creation screen, click to expand Timing & Display.

  4. Check Set time limit, then enter a Time Limit in minutes.

  5. Click Edit Timer Settings.

  6. In the Timing dialog, under Quiz Start, select Synchronous: Timer starts on the start date.
    Note: If there is no Start time and date set for the synchronous quiz, a No start date set alert appears under the radio button option and you are not able to save the quiz. Due date is disabled for synchronous quizzes. End date is not necessary but can be added.

  1. Under When The Time Limit Expires, select one of the following:

    • Automatically submit the quiz attempt

    • Flag as "exceeded time limit" and allow the learner to continue working

    • Do nothing: the time limit is not enforced

  2. Click OK.


Inserting Images into Questions

1. Select your Question type (E.g. Multiple Choice)

Image shows the new question dropdown highlighting the MC type question with a light blue background

3. Select the method in which you would like to upload your
image into the question (E.g. desktop file, url link, etc.)

Add a file page is open and options to add a file are listed in the image.

2. Select the Add Image icon within the text box.

Image is on the MC page where you can create a MC type question with question text and the associated answers. The add image button is highlighted.
 
Grades

What is the Grades Tool?

Use the Grades tool in your course to share grades with students for various assessments, calculate class averages, and provide feedback . You can set up a gradebook that reflects your own approach to evaluation where you can control the grading formula used to calculate grades, how grade items are associated with other tools, when grades are released to users and what information they see.

Accessing the Grades Tool

The Grades tool is one of the links found on the default navigation bar of your CourseLink course site and can be accessed directly from that link.

nav-f2f-grades.png

For Distance Education (DE) courses, the link appears under the drop-down menu of the Tools link on the navigation bar.

If you are using a custom navigation bar and the Grades link has been removed, you may re-add it. For more information on that process, please see our Navigation Bar page.

Using the Grades Tool

For the most up-to-date information on how to use the Discussions tool, please follow the links below to the Brightspace Help documentation site.

Getting started

GRADE EXEMPTIONS

MANAGING GRADES


When and why should you consider using the Grades tool? 

The Grade tool is a great way to collect and organize student grades online. There are many advantages to using the Grade tool including:

GRADING AND ASSESSMENT

Grade items represent the individual assignments, quizzes, performance measurements, etc., that you want to grade users on. Each grade item has its own entry in the grade book, which you assign a grade to for each user. Grade items can be tied to other course objects, such as quizzes or discussion forums, or they can exist independently. Grade items can be graded numerically, based on a grade scheme, or with a simple text message, depending on the grade item type chosen.

ORGANIZING GRADES

Use grade book categories to organize and group related grade items into sections. For example, you could have separate categories for Dropbox Submissions, Quizzes, Case Studies, Participation, Discussions, and so on. When grade items are grouped together in a category, you can distribute points equally across all grade items and drop the highest or lowest item in the group.

IMPORTING AND EXPORTING GRADES

You can enter grades in another application, such as Microsoft Excel, and import them into CourseLink using a CSV or TXT file. You can also create new grade items through an import file by adding a column to the file.

The import file must follow a standard format; use the Grades sample import file as a reference point. We recommend that you set up your grade book in CourseLink even if you want to enter grades in a CSV or TXT file. You can then use the Export Grades option to create an appropriately structured file.

CREATING A GRADE FORMULA

Use the Formula Editor to define a formula that calculates a grade item’s value based on other grade items. When you create a formula, you specify which grade items you want included in the formula and the relationships between them. An example of a simple formula is one that calculates the sum of a number of grade items. A more complicated formula is one that drops the minimum or maximum value from a set of grade items.

The Formula Editor is available on the New Item page and Edit Item page for Formula items, and the Edit Calculated Final Grade page and Edit Adjusted Final Grade page for the Formula grading system.

Formula examples:

Give users who achieved over 85% on all items in the category 100%.
=IF{MIN{[Week1.Percent],[Week2.Percent],[Week3.Percent]}<85,0,100}

Find the best 2 out of 3 grades.
=MAX{[G1.Points Received],[G2.Points Received]} + IF{(MAX[G2.Points Received],[G3.Points Received]} = MAX{[G1.Points Received],[G2.Points Received]}), MAX{G1.Points Received],[G3.Points Received]}, MAX{[G2.Points Received],[G3.Points Received]}}

TRACKING GRADE EVENT LOGS

Event logs maintain a record of changes made to your grade book. The logs can be useful when auditing a grade book, managing teaching assistants, and discussing grades with users.

  • User Grades Event Log records all of the changes made to a particular user’s grades.

  • Grade Item Event Log records changes to users’ grades on a single grade item.

  • Final Grade Event Log records changes to users’ final grades.

  • Manage Grades Event Log records changes made to the properties or restrictions of a specific grade item.

  • Restoring Grade Item Event Log records the date and time a grade item is created or removed, and the user who performs the action.

PREPARING FINAL GRADES

Please refer to the section on Final Grades Download Tool.

Exemptions

Category scores that include exemptions

For category scores, grade exemptions affect the scores as follows:

  • Exempted grade items are excluded from the calculation of category scores. The grade item is treated as though it does not exist within the category.

  • In a category with drop rules, exempted items are removed before the specified number of grade items are dropped. Then, the category is calculated with the remaining items.

  • If all the items in a category are exempted, there are not grade item scores to use in calculating a category score. In this case, the category does not have a score.

  • In a weighted grade book, the exemption of a category item results in the remaining item weights not reaching 100%. Brightspace automatically scales the weights of the remaining items proportionally to each other.

Calculated grade items that include exemptions

For calculated grade item scores, grade exemptions affect the scores as follows:

  • Exempted items are excluded from the calculated score.

  • If all items in a calculated grade item are exempted, the item does not have a calculated score.

Video Assignments

What is the Video Assignments tool?

The Video Assignments tool can help students develop their communication, collaboration, and critical thinking skills. There are 4 different Video Assignment types you can use within Bongo:

  • Individual Project

  • Question & Answer

  • Group Project

  • Interactive Video

Accessing the Video Assignments Tool

The Video Assignments tools is not one of the default links in the navigation bar of your CourseLink course site, therefore you will need to add it your navigation bar. To do so please follow the instructions provided in the Customize Navbar section.

For Distance Education (DE) courses, the link appears under the drop-down menu of the Tools link on the navigation bar (provided that the course is using Dropbox).

Location of the Dropbox link on a DE course site


Using the Video Assignments tool?

For the most up-to-date information on how to setup a Dropbox folder, please follow the links below to the Brightspace Help documentation site.

The image has a red arrow pointing to 3 lines in a red circle

Click Assignments. This will take you to the Assignment List page.

Select Assignment Type

Once you are on the Assignment List page, click the Plus icon in the lower right corner. 

Pick the video assignment type that best suits your desired outcomes: 

Add Assignment to Content

After creating an assignment within Brightspace, you will need to add the assignment to Content so users can see the assignment. Click Content

Content highlighted in light red

When you click on Content, the Table of Contents will display. Click on the Add Existing Activities button.


Click Add Existing Activities dropdown button is highlighted in light red

From the dropdown, select Video Assignment.


Video Assignment dropdown option highlighted in a light red

The Add Activity box will appear. To add a particular assignment to a user’s course, select the desired assignment.


Video Assignment Basics


Tutorial Videos


Video Assignments FAQs


Related Resources and Programming:

Coming Soon!


Related Tools


Need More Help?

If you're still having trouble, please contact the CourseLink Support team for assistance.


Turnitin (Dropbox Integration)

What is the Turnitin Dropbox Integration?

Turnitin is a cloud-based solution with capabilities in originality checking and online grading using their OriginalityCheck and GradeMark tools. Turnitin saves instructors time and facilitates personalized feedback for learners.

OriginalityCheck lets you monitor Assignment submissions and identify potential cases of plagiarism by automatically comparing submissions to an online database of original content. You can then view Originality Reports which highlight key areas, show a breakdown of matching sources, and provide direct links to the matching content.

You can also take advantage of the integrated GradeMark which lets you add comments, inline text, and highlight sections in file submissions, directly from the Dropbox tool.


Initial Considerations

Turnitin is an originality checker, not a plagiarism detection tool. Determining plagiarism requires human judgment, on the part of course instructors, and perhaps most importantly on the part of students. To recognize plagiarism, is essential that students understand the concept of academic integrity as well as the various components of academic writing, including proper citation and use of sources.

Turnitin needs to be used as a learning tool, engaging with students and the writing process, when appropriate, allowing students to submit multiple drafts. Instructors can work with Writing Services at the Library to tailor activities that will help students understand and recognize proper academic writing.

Instructors are encouraged to take a curricular approach to the use of Turnitin and integrate its use with the course’s overall approach to academic writing within the programme curriculum. It should be part of a larger effort to promote students’ understanding academic integrity.

Turnitin should be aligned with the students’ academic progress. The approach with first year students may be different than with students later on in their degree. Use of the tool should be aligned according to the writing and academic integrity needs of the specific discipline.

Finally, consider designing plagiarism-resistant assignments.


GradeMark

Another feature of Turnitin is GradeMark, a tool which facilitates the marking of online assignments and the providing of feedback. The GradeMark tool includes inline commenting and markup, saving paper and providing quick and detailed comments to students within CourseLink, the online learning management system. This feature streamlines the marking process providing instructors with a collection of pre-formatted comments, but also allows faculty to add more detailed individual comments.

Please note that GradeMark must be enabled to activate the Originality Check option. However, you do not need to use GradeMark to assess Dropbox submissions once the feature is enabled.


What file types are supported in OriginalityCheck?

The following file types are compatible with OriginalityCheck:

  • Microsoft Word (DOC, DOCX)

  • Corel WordPerfect (WPD)

  • Adobe PostScript (EPS)

  • Adobe Acrobat PDF

  • HTML (HTM, HTML)

  • Rich text (RTF)

  • Plain text (TXT)

If students are submitting other file types to a dropbox with Turnitin enabled, they will have to enable Turnitin for all files.


Enable Turnitin Integration for a Dropbox

To enable Turnitin for a dropbox assignment, do the following:

A red arrow is pointing at dropbox
  1. From the Dropbox tool, click New Folder or click on the arrow to the right of the folder and click edit.

    i. Give the dropbox a name.

  2. Expand Evaluation and Feedback.

  3. Scroll down and click “Manage Turnitin”.

  4. Click Enable Turnitin for this folder.

  5. Once enabled, you can continue to create the details for the new assignment, including more options in Turnitin, such as configuring OriginalityCheck and GradeMark functionalities.

  6. Click Save and Close.


Using the Dropbox Turnitin Integration

For the most up-to-date information on how to use the Dropbox Turnitin Integration, please follow the links below to the Brightspace Help documentation site.

List


Informing Students

For those instructors intending to use Turnitin in their course, it is required that you inform your students accordingly within your Course Outline. The Course Outline Checklist provided by the Associate Vice President Academic includes a section about “Academic Misconduct.” We recommend that within this section of your Course Outline you include commentary about plagiarism and the use of Turnitin.

Here are example statements on Turnitin and Academic Misconduct:

Turnitin

In this course, your instructor will be using Turnitin, integrated with the CourseLink Dropbox tool, to detect possible plagiarism, unauthorized collaboration or copying as part of the ongoing efforts to maintain academic integrity at the University of Guelph.

All submitted assignments will be included as source documents in the Turnitin.com reference database solely for the purpose of detecting plagiarism of such papers. Use of the Turnitin.com service is subject to the Usage Policy posted on the Turnitin.com site.

A major benefit of using Turnitin is that students will be able to educate and empower themselves in preventing academic misconduct. In this course, you may screen your own assignments through Turnitin as many times as you wish before the due date. You will be able to see and print reports that show you exactly where you have properly and improperly referenced the outside sources and materials in your assignment.

Academic Integrity

The University of Guelph is committed to upholding the highest standards of academic integrity, and it is the responsibility of all members of the University community-faculty, staff, and students-to be aware of what constitutes academic misconduct and to do as much as possible to prevent academic offences from occurring. University of Guelph students have the responsibility of abiding by the University's policy on academic misconduct regardless of their location of study; faculty, staff, and students have the responsibility of supporting an environment that encourages academic integrity. Students need to remain aware that instructors have access to and the right to use electronic and other means of detection.

Please note: Whether or not a student intended to commit academic misconduct is not relevant for a finding of guilt. Hurried or careless submission of assignments does not excuse students from responsibility for verifying the academic integrity of their work before submitting it. Students who are in any doubt as to whether an action on their part could be construed as an academic offence should consult with a faculty member or faculty advisor.

Undergraduate Calendar - Academic Misconduct

Graduate Calendar - Academic Misconduct


Resources

Academic Integrity

Donald L. McCabe and Gary Pavela, Ten (Updated) “Principles of Academic Integrity: How Faculty Can Foster Student,” Change, Vol. 36, No. 3 (May – Jun., 2004), pp. 10-15
, http://www.tandfonline.com/doi/pdf/10.1080/00091380409605574

Julia M. Christensen Hughes and Donald L. McCabe, “Academic Misconduct within Higher Education in Canada,” Canadian Journal of Higher Education Revue canadienne d’enseignement supérieur, Volume 36, No. 2, 2006, pages 1 – 21, http://eric.ed.gov/?id=EJ771043

Julia M. Christensen Hughes and Donald L. McCabe, “Understanding Academic Misconduct,” Canadian Journal of Higher Education Revue canadienne d’enseignement supérieur, Volume 36, No. 1, 2006, pages 49 – 63, http://eric.ed.gov/?id=EJ771037

Plagiarism

“Best Practices for Preventing Plagiarism” Webster University, http://www.webster.edu/faculty/ppp/best-practices-for-preventing-plagiarism.html

University of Guelph Resources

AVPA, “Course Outline Checklist” http://www.uoguelph.ca/vpacademic/avpa/checklist/

“Academic Misconduct,” Undergraduate Calendarhttps://www.uoguelph.ca/registrar/calendars/undergraduate/current/c08/c08-amisconduct.shtml

Tutorial Videos


Turnitin FAQs


Turnitin Support Documentation


Related Tools


Need More Help?

If you're still having trouble, please contact the CourseLink Support team for assistance.


Dropbox

What is the Dropbox tool?

Students use the Dropbox tool to upload and submit assignments to the Dropbox submission folders in CourseLink, eliminating the need to mail, fax, or email their work to instructors.

Instructors use the Dropbox tool to see students’ submission times, download Dropbox submission folders to their computer, view submissions on the Evaluate Submission page, associate Dropbox submission folders to grade items/rubrics, and return submissions with grades and feedback.

In the Folder Submissions area, instructors can view students' submissions and submission dates, eliminating the need to collect assignments and making it easy to track when files were submitted.

Instructors can create categories to group and organize assignment submission folders. They can also restrict access to assignment submission folders by date and time, group membership, or use special access permissions.

Accessing the Dropbox Tool

The Dropbox tool is one of the links found on the default navigation bar of your CourseLink course site and can be accessed directly from that link.

Location of the Dropbox link on a face-to-face course site

For Distance Education (DE) courses, the link appears under the drop-down menu of the Tools link on the navigation bar (provided that the course is using Dropbox).

Location of the Dropbox link on a DE course site


New Experience Using the Dropbox

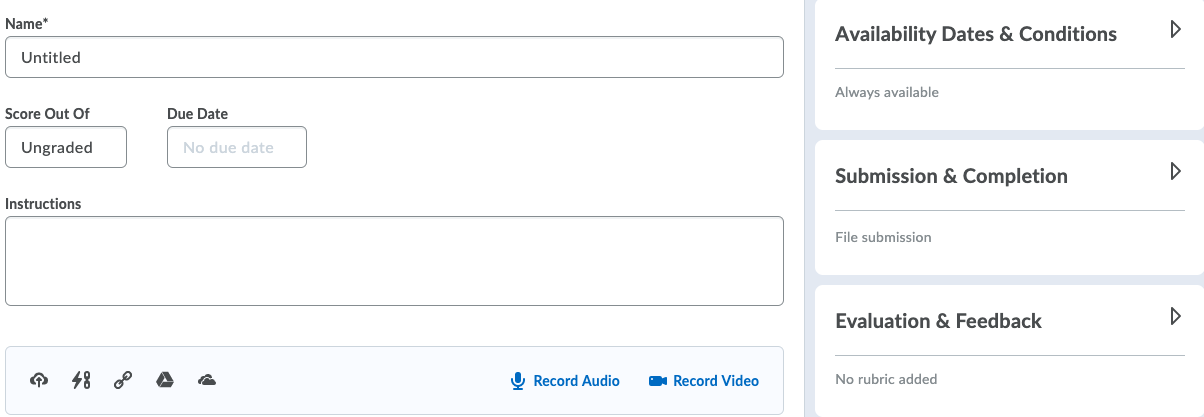
The main panel on the left allows instructors to add a name, score out of, due date, instructions, and attachments.

The panel on the right allows instructors to organizes more advanced options. This includes start and end dates, rubrics, annotation tools, and Turnitin. When these options are collapsed, summary text provides details about which settings are active and subtle hints that aid in the discovery of additional settings. 

The new experience automatically syncs the Dropbox assignments including the name and score to the gradebook. If you create grade items in advance, support for selecting existing grades and categories is also available.

Note: To select the existing Grades column in the Dropbox, you must enter a score in the Score Out Of text field.

Instructors are temporarily able to opt in and out of the new experience based on preference.

Screen Shot 2020-07-17 at 4.50.19 PM.png

Using the Dropbox tool?

For the most up-to-date information on how to setup a Dropbox folder, please follow the links below to the Brightspace Help documentation site.

Please note that the documentation on the Brightspace Help site refers to the Dropbox tool as Assignments, however CourseLink still uses the original name of the tool (Dropbox). They are the same tool.
— CourseLink Support
 

When and why is it a good idea to use the Dropbox tool?

The Dropbox tool is a great way to collect student assignments online. There are many advantages to using Dropbox for assignment collection, including:

Access Control and Submission Tracking

The ability to restrict access via start, end, and due dates

Grading and Assessment

Each Dropbox folder will allow a TA or instructor to assign a grade to a students work either as a simple score, or when a rubric is attached, a score as well as the completed rubric will be available to the student once published. That grade and the corresponding feedback will automatically transfer to the student’s corresponding grade item when published.

When working with group submissions, all members

Integration with Turnitin

Similarity checking and digital markup

Providing Feedback

When grading student submissions to a Dropbox folder, an instructor or TA will be able to leave feedback via text, file attachments, audio recording, or video recording. This feedback becomes available to the student as soon as their grade is published via the Dropbox and the corresponding grade item (if linked).

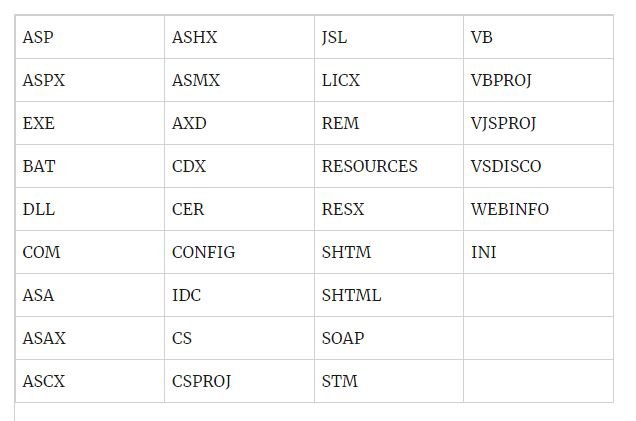
Restricted Files

These are the file types that are restricted from being submitted to the dropbox.