Instructors: CourseLink Tools — CourseLink Documentation & Support

Instructors: CourseLink Tools

The information on this page is intended for instructors using a CourseLink course site.

Posts by CourseLink Support
Share OneDrive Video Files via CourseLink’s Content Tool

Introduction

As more video resources end up on OneDrive via Teams recordings and the OpenEd Zoom Transfer Tool, knowing how to share those video files via CourseLink’s Content tool with proper access permissions is an important skill. This guide will demonstrate the process for instructors to properly link and share a video file from OneDrive on CourseLink.


Getting Video Files on OneDrive

In some cases, such as recorded Teams meetings or Zoom meetings that have been transferred from the Zoom cloud to OneDrive using OpenEd’s Zoom Transfer Tool, video files will already be present on an instructor’s UofG OneDrive account.

If there is a need to add videos to OneDrive from other sources, we would recommend visiting the CCS OneDrive for Business support page or contacting their Help Desk (58888help@uoguelph.ca or x.58888).


Sharing Videos on OneDrive with a CourseLink Classlist

Any CourseLink site with a Classlist-linked Microsoft Security Group can easily share a OneDrive video file with any students who are on the CourseLink course site’s Classlist.

Please visit our Classlist-linked Microsoft Security Group page for information on how to enable and locate your linked security group code.

Once you have your security group code, please follow the steps below to share your OneDrive video file with any users that appear on your CourseLink course site’s Classlist.

  1. Open a web browser and access Webmail, then use the apps menu (9 squares) to access OneDrive.
Location of OneDrive link in Webmail. There is a 1 in a red circle with a red arrow pointing to 9 squares and a red 2 in a red circle with a red arrow pointing to a Link to OneDrive.
  1. Navigate to My files from the left menu.
Location of the My file link in OneDrive. An Arrow pointing to My Files.
  1. Locate the folder that contains the file you want to share and select it to show the file.
  2. Hover your mouse over the file to reveal and click on the Share icon that appears.
Location of the Share icon for a file in OneDrive. A red arrow pointing to the share button. The share button has a right angle where another arrow is coming from and going to the right.
  1. Enter the security group code for the course site you want to share the video on and wait for OneDrive to locate the matching code, then select it and click Copy link
Locations of: 1. Enter security group code. 2. Search result (to click). 3. Copy link icon
  1. Continue to the next section to learn how to use that copied link in CourseLink’s Content tool.

NOTE: Security groups refresh daily throughout the semester with updated student registrations. It may take up to 24 hours before a new student gains access to a resource shared via a Classlist-linked Microsoft Security Group.


Using the Content Tool to Link to a OneDrive Video File

Once the video file is shared with a course site’s Classlist-linked Microsoft Security Group, you may add it to your CourseLink course site by linking to the video from the Content tool. To do that, please follow the steps below:

  1. Navigate to CourseLink and access the course site where you want to add a link to a video file shared using a Classlist-linked Microsoft Security group on OneDrive.
  2. Select Content from the navigation bar.
  3. Select or create a module where you would like to add the video link.
Example of selecting a module via CourseLink’s Content tool. A red arrow pointing to an example module.
  1. On the right side of the screen, select the Upload/Create option, then select Create a Link.
Locations of the Upload/Create button and the Create a Link option. There is a 1 in a red circle with a red arrow pointing to the Upload/Create button and a 2 in a red circle with a red arrow pointing to Create a Link.
  1. Enter a title that describes the video’s content and paste in the URL from the link that was generated when the video was shared using the security group code (see the above section Sharing Videos on OneDrive with a CourseLink Classlist), then click Create.
Where to enter the title and url, as well as the location of the Create button. The Title and URL text boxes are in a red border box as well as the Create button in it's own red border box.

Note: Open as External Resource should be selected by default. If it is not, please ensure it is selected.

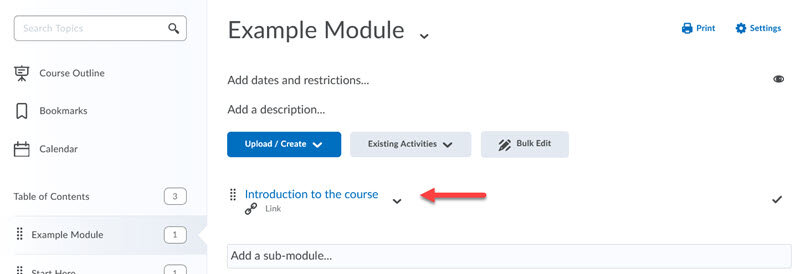
  1. The video will now be accessible by anyone on that course site’s Classlist via the Content tool.
Example of the added video file link in the content module. It has a red arrow pointing to the "Introduction to the course" link in the Example module.

Need More Help?

If you're still having trouble, please contact the CourseLink Support team for assistance.


CourseLink Support
Zoom Transfer Tool – Review Recordings in OneDrive

Introduction

After authorizing the Zoom Transfer Tool and setting up your first transfer, you will be able to view the transferred files in OneDrive within 24 hours. We recommend reviewing these files after your first transfer, so you are familiar with the format and naming conventions.

Please note, these instructions are specific to reviewing your transferred Zoom recordings in OneDrive. For general support with OneDrive, please contact CCS.


Access OneDrive from Webmail

Login to your University of Guelph/Guelph-Humber email address within your preferred web browser.

Within your webmail, open the menu in the top left corner (9 squares) and select One Drive.

How to access OneDrive from WebMail.

Under My files, select Zoom Transfers.

Example of the Zoom Transfers folder on OneDrive.

Within the Zoom Transfers folder, you will find a folder matched to the corresponding Zoom account email with a maximum length of 40 characters.

Example of the Zoom account folder on OneDrive.

Recording Names

Within the Zoom account email folder is another set of folders. What you see will be determined by what you transferred. These folders group together everything from a specific Zoom meeting.

Example of folders for each Zoom recording on OneDrive.

All folders are named using the same convention:

  1. The meeting name with spaces replaced by underscores (_)

    • Academic_Continuity_-_Demo_Recording

  2. The Zoom meeting ID

    • 93583110235

  3. The date and time the meeting started, format: YYYYMMDD_HHMMSS

    • 20200826_125849

Within a meeting folder, you will find all the files associated with that meeting.

Example of the files listed pertaining to a single recordings located within its folder.

All files are named using the same convention:

  1. The meeting ID

    • 93583110235

  2. The date and time the recording started, format YYYYMMDD_HHMMSS

    • 20200826_130228

  3. The file type represented as a 2-digit code

    • 02

  4. The appropriate file extension

    • .MP4

Please note, the name inside the folder does not include the meeting name.

Files can be identified using the file type and extension information. Depending on what you capture, you may see different file types. The mostly likely files to find based on the default cloud recording settings are bolded below.

Type

Code

Extension

Shared screen with speaker view

01

JSON

Shared screen with speaker view (CC) video

01

MP4

Shared screen with speaker view (CC) captions

01

VTT

Shared screen with speaker view (default)

02

MP4

Shared screen with gallery view

03

MP4

Speaker view

04

MP4

Gallery view

05

MP4

Shared screen

06

MP4

Audio only

07

M4A

Audio transcript

08

VTT

Chat file

09

TXT

Active speaker view

10

MP4

Poll results

1


Need More Help?

If you're still having trouble, please contact the CourseLink Support team for assistance.


CourseLink Support
Zoom Transfer Tool

Introduction

OpenEd has developed a Zoom recording transfer tool to assist you with managing and transferring cloud recordings between your UofG Zoom Pro account and your UofG OneDrive account. The OpenEd Zoom cloud recording storage space is not unlimited, and we must regularly delete old recordings to allow for future recordings. The Zoom Transfer Tool makes the process of copying your Zoom cloud recordings to OneDrive simple and offers the option to automate the process for all future Zoom cloud recordings.


Signing In (SSO)

Please sign in via https://apps1.opened.uoguelph.ca/zoomtransfer/ with the UofG central account that matches the Zoom email account.

Note: You may have to end your existing SSO session and log in with the correct central account if you have multiple accounts.


Authorizing

The Zoom Transfer Tool allows users to transfer copies of all their recordings, transcripts, and chat files from the Zoom Cloud to their personal University of Guelph OneDrive account. Files are placed within a subfolder titled “Zoom Transfers” and organized by Topic Name, Meeting ID, and Date. Once recordings are transferred, users can access and share files as they would any other files in OneDrive.

Transfer requests are processed within 24 hours and an email confirmation is sent on completion. Cloud recordings are not removed as part of the transfer.

To use the Zoom Transfer Tool to copy recordings from your Zoom account(s) to your OneDrive account, you must first authorize the application to access and integrate with your OneDrive account by clicking the Authorize button.

Location of the Authorize button. A red arrow is pointing at the Authorize button.
 

Transfer Recordings

To transfer individual recordings, click the Transfer Recordings option on the menu bar or select the Search & Transfer Existing Recordings button.

Location of the Transfer Recordings link on the navigation bar. A red arrow is pointing at the Transfer Recordings button/link.

From the the Search Zoom Recordings page, follow the steps below:

  1. Select the Zoom account (almost all accounts will have one option).

  2. Select the recording start date (ideally, before the oldest recording).

  3. Select the recording end (today for the most recent recordings).

  4. Click the View Zoom Recordings button.

Locations of the options for Zoom Account, Recording Start Date, Recording End Date, and the View Zoom Recordings button. There is 4 red circles to the right of the respective steps with the numbers 1-4.

The Zoom Transfer Tool will find your Zoom cloud recordings and list them. Select (or deselect) the recordings that you would like transferred to OneDrive. Click Request Cloud Transfer.

Example of selecting specific Zoom cloud recordings. A red Arrow is pointing to the checkmark box to select the recoding.

You will then be sent the Transfer Log screen where you can review the recordings that will be transferred. If you wish to cancel the request, click the Cancel button under the Transfer Status column.

Location of the Cancel button.

The listed requests will be completed within 24 hours. We do not recommend deleting your Zoom cloud recordings until that process is complete and you have verified the files are on your OneDrive. Please see the Zoom Transfer Tool – Review Recordings in OneDrive page for more information on how to access your copied Zoom recordings.


Automate Zoom Transfers

The Zoom Transfer tool can automate the transfer of future recordings. Once the Automate Zoom Transfers option is enabled on a Zoom account, the Zoom Transfer Tool will transfer new Zoom cloud recordings to your OneDrive account as soon as they are processed and available on the Zoom cloud.

Once Automate Zoom Transfers is enabled, you will not need to return to the tool to manually transfer files unless a transfer fails. This will also ensure that you will have backups of any cloud recordings ahead of any future cloud storage space recovery performed by OpenEd.

The option to toggle Automate Zoom Transfers on can be located by clicking Automate Transfers in the navigation menu.

Location of the Automate Transfers link on the navigation menu. A red arrow is pointing to the option.

Automated Transfer requests are processed within 24 hours. An email confirmation will be sent when the copy process is complete. Please note that recordings are not removed from Zoom cloud as part of the transfer.

To enable:

  1. Click and enable the toggle beside the Zoom email address.

  2. Click the Save Automations button.

Example of how to enable automated Zoom transfers. A red circle with the number 1 is to the right of Zoom email address and a 2 in a red circle is to the right of the save automations.

You may return at any time to disable Automated Transfers.


Transfer Log

The Transfer Transaction Log allows you to review all active and completed transfer requests. Any recent requests will be displayed below the filter options.

You can filter between specific meeting/recording dates or between transfer dates, as well as by the Transfer Request Status.

Example of the available filter options in for the Transfer Log.

Note: Failed transfer requests will automatically retry only once within the following 24 hours. If the request fails a second time, the user may manually download the files from Zoom. Links to download any failed files from Zoom will appear in the error notification email. If you require any assistance, please contact CourseLink Support.


Deauthorize Application

If you have previously authorized the Zoom Transfer Tool to access your OneDrive account, you may choose to revoke this applications access to your OneDrive account, preventing further access. Deauthorizing the application will:

  • Prevent any pending requests from being transferred

  • Prevent any requests for future recordings to be transferred

  • Disable the option to Automate Transfers

  • Maintain access to the Transfer Logs of previous requests

If you deauthorize this application, you may reauthorize at any time.

Tutorial Videos


Need More Help?

If you're still having trouble, please contact the CourseLink Support team for assistance.


Surveys

What is the Surveys Tool?

Create surveys and use the statistics tools to monitor current course trends, seek opinions, and assess user satisfaction.

Surveys are an excellent way to solicit feedback from users regarding any aspect of your course. For example, they can be used as a method of collecting course evaluations, mid-year reviews, or researching users’ learning style and content delivery preferences.

Accessing the Surveys Tool

The Surveys tool is not one of the links found on the default navigation bar of your in-class CourseLink course site. The Surveys tool will need to be Added to your Navbar.

A red arrow is pointing at the Surveys tool link

For Distance Education (DE) courses, the Surveys link appears under the drop-down menu of the Tools link on the navigation bar (provided that the course is using Surveys).

A red arrow points to the Surveys Link
 

Using the Survey Tool

For the most up-to-date information on how to use the Surveys tool, please follow the links below to the Brightspace Help documentation site.

Monitor course trends and assess satisfaction


When and why should you consider using the Surveys tool? 

Create surveys and use the statistics tools to monitor current course trends, seek opinions, and assess user satisfaction. Surveys are an excellent way to solicit feedback from participants regarding any aspect of a course. For example, use surveys as a method of collecting course evaluations, mid-year reviews, or researching people's learning styles and content delivery preferences.


Related Tools


Need More Help?

If you're still having trouble, please contact the CourseLink Support team for assistance.


Widgets

What is the a Widget?

The homepage is the first page you see when you view the organization's My Home page or enter a course. The typical default homepage is widget-based. Widgets are sections of content that provide information and links to tools, courses, and personal settings. Organization and course homepages can point to Brightspace Learning Environment tools, such as Announcements or Content, or an external URL.

Widgets are the building blocks of homepages. You can create, edit, delete, customize, and preview the widgets in your organization.

Accessing the Widget Tool

The Widget tool is found under Course Admin in your Navbar, under Site Setup, if you are sorting tools by category.


Using Widgets

For the most up-to-date information on how to use widgets, please follow the links below to the Brightspace Help documentation site.


When and why should you consider using Widgets?

System widgets are available as part of CourseLink and cannot be edited or deleted, but you can remove them from a homepage or move them to a different section of a homepage using the Homepage Management tool. Additionally, you can change the appearance of system widgets using the same properties as custom widgets (i.e., border style, title bar color and more).

Custom widgets allow you to expand the functionality of available content in your homepages to suit your specific organizational and/or course needs. You can add custom HTML code to create a wide range of widgets.

Tutorial Videos


Related Tools


Need More Help?

If you're still having trouble, please contact the CourseLink Support team for assistance.


Homepages

What is the Homepage Tool?

The homepage is the first page you see when you view a course. The typical default homepage is widget-based. Widgets are sections of content that provide information and links to tools, courses, and personal settings. Organization and course homepages can point to CourseLink tools, such as Announcements or Content, or an external URL.

All new courses are initially set up with a default course homepage by CourseLink support. You can use the Homepage Management tool to create a new homepage and set it as the active homepage for your course.

Accessing the Homepage Tool

The Homepage tool is found under Course Admin in your Navbar, under Site Setup, if you are sorting tools by category.

Location of the Homepages link on a DE course site
 

Using the Homepage Tool

For the most up-to-date information on how to use the Homepage tool, please follow the links below to the Brightspace Help documentation site.


Tutorial Videos


Related Tools


Need More Help?

If you're still having trouble, please contact the CourseLink Support team for assistance.


Turnitin (Dropbox Integration)

What is the Turnitin Dropbox Integration?

Turnitin is a cloud-based solution with capabilities in originality checking and online grading using their OriginalityCheck and GradeMark tools. Turnitin saves instructors time and facilitates personalized feedback for learners.

OriginalityCheck lets you monitor Assignment submissions and identify potential cases of plagiarism by automatically comparing submissions to an online database of original content. You can then view Originality Reports which highlight key areas, show a breakdown of matching sources, and provide direct links to the matching content.

You can also take advantage of the integrated GradeMark which lets you add comments, inline text, and highlight sections in file submissions, directly from the Dropbox tool.


Initial Considerations

Turnitin is an originality checker, not a plagiarism detection tool. Determining plagiarism requires human judgment, on the part of course instructors, and perhaps most importantly on the part of students. To recognize plagiarism, is essential that students understand the concept of academic integrity as well as the various components of academic writing, including proper citation and use of sources.

Turnitin needs to be used as a learning tool, engaging with students and the writing process, when appropriate, allowing students to submit multiple drafts. Instructors can work with Writing Services at the Library to tailor activities that will help students understand and recognize proper academic writing.

Instructors are encouraged to take a curricular approach to the use of Turnitin and integrate its use with the course’s overall approach to academic writing within the programme curriculum. It should be part of a larger effort to promote students’ understanding academic integrity.

Turnitin should be aligned with the students’ academic progress. The approach with first year students may be different than with students later on in their degree. Use of the tool should be aligned according to the writing and academic integrity needs of the specific discipline.

Finally, consider designing plagiarism-resistant assignments.


GradeMark

Another feature of Turnitin is GradeMark, a tool which facilitates the marking of online assignments and the providing of feedback. The GradeMark tool includes inline commenting and markup, saving paper and providing quick and detailed comments to students within CourseLink, the online learning management system. This feature streamlines the marking process providing instructors with a collection of pre-formatted comments, but also allows faculty to add more detailed individual comments.

Please note that GradeMark must be enabled to activate the Originality Check option. However, you do not need to use GradeMark to assess Dropbox submissions once the feature is enabled.


What file types are supported in OriginalityCheck?

The following file types are compatible with OriginalityCheck:

  • Microsoft Word (DOC, DOCX)

  • Corel WordPerfect (WPD)

  • Adobe PostScript (EPS)

  • Adobe Acrobat PDF

  • HTML (HTM, HTML)

  • Rich text (RTF)

  • Plain text (TXT)

If students are submitting other file types to a dropbox with Turnitin enabled, they will have to enable Turnitin for all files.


Enable Turnitin Integration for a Dropbox

To enable Turnitin for a dropbox assignment, do the following:

A red arrow is pointing at dropbox
  1. From the Dropbox tool, click New Folder or click on the arrow to the right of the folder and click edit.

    i. Give the dropbox a name.

  2. Expand Evaluation and Feedback.

  3. Scroll down and click “Manage Turnitin”.

  4. Click Enable Turnitin for this folder.

  5. Once enabled, you can continue to create the details for the new assignment, including more options in Turnitin, such as configuring OriginalityCheck and GradeMark functionalities.

  6. Click Save and Close.


Using the Dropbox Turnitin Integration

For the most up-to-date information on how to use the Dropbox Turnitin Integration, please follow the links below to the Brightspace Help documentation site.

List


Informing Students

For those instructors intending to use Turnitin in their course, it is required that you inform your students accordingly within your Course Outline. The Course Outline Checklist provided by the Associate Vice President Academic includes a section about “Academic Misconduct.” We recommend that within this section of your Course Outline you include commentary about plagiarism and the use of Turnitin.

Here are example statements on Turnitin and Academic Misconduct:

Turnitin

In this course, your instructor will be using Turnitin, integrated with the CourseLink Dropbox tool, to detect possible plagiarism, unauthorized collaboration or copying as part of the ongoing efforts to maintain academic integrity at the University of Guelph.

All submitted assignments will be included as source documents in the Turnitin.com reference database solely for the purpose of detecting plagiarism of such papers. Use of the Turnitin.com service is subject to the Usage Policy posted on the Turnitin.com site.

A major benefit of using Turnitin is that students will be able to educate and empower themselves in preventing academic misconduct. In this course, you may screen your own assignments through Turnitin as many times as you wish before the due date. You will be able to see and print reports that show you exactly where you have properly and improperly referenced the outside sources and materials in your assignment.

Academic Integrity

The University of Guelph is committed to upholding the highest standards of academic integrity, and it is the responsibility of all members of the University community-faculty, staff, and students-to be aware of what constitutes academic misconduct and to do as much as possible to prevent academic offences from occurring. University of Guelph students have the responsibility of abiding by the University's policy on academic misconduct regardless of their location of study; faculty, staff, and students have the responsibility of supporting an environment that encourages academic integrity. Students need to remain aware that instructors have access to and the right to use electronic and other means of detection.

Please note: Whether or not a student intended to commit academic misconduct is not relevant for a finding of guilt. Hurried or careless submission of assignments does not excuse students from responsibility for verifying the academic integrity of their work before submitting it. Students who are in any doubt as to whether an action on their part could be construed as an academic offence should consult with a faculty member or faculty advisor.

Undergraduate Calendar - Academic Misconduct

Graduate Calendar - Academic Misconduct


Resources

Academic Integrity

Donald L. McCabe and Gary Pavela, Ten (Updated) “Principles of Academic Integrity: How Faculty Can Foster Student,” Change, Vol. 36, No. 3 (May – Jun., 2004), pp. 10-15
, http://www.tandfonline.com/doi/pdf/10.1080/00091380409605574

Julia M. Christensen Hughes and Donald L. McCabe, “Academic Misconduct within Higher Education in Canada,” Canadian Journal of Higher Education Revue canadienne d’enseignement supérieur, Volume 36, No. 2, 2006, pages 1 – 21, http://eric.ed.gov/?id=EJ771043

Julia M. Christensen Hughes and Donald L. McCabe, “Understanding Academic Misconduct,” Canadian Journal of Higher Education Revue canadienne d’enseignement supérieur, Volume 36, No. 1, 2006, pages 49 – 63, http://eric.ed.gov/?id=EJ771037

Plagiarism

“Best Practices for Preventing Plagiarism” Webster University, http://www.webster.edu/faculty/ppp/best-practices-for-preventing-plagiarism.html

University of Guelph Resources

AVPA, “Course Outline Checklist” http://www.uoguelph.ca/vpacademic/avpa/checklist/

“Academic Misconduct,” Undergraduate Calendarhttps://www.uoguelph.ca/registrar/calendars/undergraduate/current/c08/c08-amisconduct.shtml

Tutorial Videos


Turnitin FAQs


Turnitin Support Documentation


Related Tools


Need More Help?

If you're still having trouble, please contact the CourseLink Support team for assistance.


Notifications

What is the Notifications tool?

The Notification tool allows a CourseLink user to receive messages about activity in their course sites. Users can receive a periodic summary of all new activity through email and/or receive instant notifications when certain events happen through email or SMS messages.

Notifications are available for activities involving several CourseLink tools such as:

  • Announcements

  • Content

  • Discussions

  • Dropbox

  • ePortfolio

  • Grades

  • Quizzes


Accessing the Notifications tool

Location of the Notifications link

The Notifications tool can be accessed after logging into CourseLink by following the steps below:

  1. From the CourseLink Minibar, select your name (top-right)

  2. Select Notifications from the menu


Using the Notifications tool

Setting up an email contact method

By default, email notifications are automatically sent to the email address associated with your CourseLink account. To change these settings, follow the steps below.

  1. Click on the Change your email settings link

  2. Select the Use custom email option and enter your email address in the text field

  3. Click Save

Contact Methods settings link for email


Setting up a mobile contact method

Notifications can be sent directly to your mobile phone. To associate a phone number with your CourseLink account, follow the steps outlined below.

  1. Click Register your mobile on the Notifications page

  2. Select your Country, your Mobile Carrier, and enter your Mobile Number in the form

  3. Click Save

  4. After you receive a registration confirmation code on your mobile device, enter it in the Confirmation Code field

  5. Click Confirm

Contact Methods settings link for Mobile


Subscribing to a summary of activity

Users may choose to receive a daily summary of all the activities in their courses by subscribing to a Summary of Activity that will be delivered to the user via email daily at a time of their choosing.

  1. On the Notifications page, select the delivery frequency you want from the How often? drop-down list

  2. Select when you want to receive your summary from the At what time? drop-down list

  3. Click Save

Summary of Activity options
 

Subscribing to instant notifications

Instant Notifications Options

Users can select to be notified immediately about any of the items listed under the Instant Notifications section by either email or SMS.

  1. On the Notifications page, enable instant notifications for specific course activity and updates by doing any of the following:

    • Select the Email check box to enable email notifications

    • Select the SMS check box to enable SMS notifications

  2. Click Save


Customize Notifications

Customization options are available if you want to include your grade value in Grades notifications, and if you want to allow past, future, and inactive course enrollments to send you notifications.

  1. Go to the Customize Notifications section on the Notifications page

  2. Select the check boxes beside the options you want to enable

Customize Notifications options
 

Excluding courses from notifications

You can exclude specific courses from sending you notifications.

  1. Click Manage my course exclusions in the Exclude Some Courses section on the Notifications page

  2. Click the  Exclude icon beside each course you want to exclude, or click Exclude All Courses to stop all course notifications. You can also use the Search field to find the course you want to exclude

  3. Click Close

  4. Click Save

Exclude Some Courses - manage exclusions link
 

Restoring excluded course notifications

  1. Click the Manage my course exclusions link in the Exclude Some Courses section on the Notifications page

  2. Click the  Restart notifications icon beside each course you want to receive notifications from, or click Restore excluded courses to restore all excluded courses. You can also use the Search field to find the course you want to restore

  3. Click Close

  4. Click Save

Manage Course Exclusions - Restore excluded courses options
 

When and why is it a good idea to use the Notifications tool?

The majority of the settings for notifications are intended for student use, however there are some that may be relevant to instructors as well.

Keeping on top of discussion activity in your course site

If you are actively engaging with your students via the discussions tool, you may want to subscribe to notifications for a specific forum, topic, or thread to be altered when another user posts, allowing you to reply promptly if required.

Even if you are not actively engaging with the students in the discussion, it may be beneficial to subscribe to certain discussions to keep tabs on how active they are and who is participating. It is recommended that if you are using it for this purpose that you choose the Summary of Activity option in your notification settings to receive a daily summary of all activities rather than individual messages for each post.

Site building with your TA or co-instructor

If you are creating a course site using the content tool with another user such as a TA, course coordinator, or co-instructor, then enabling the notifications for Content - content item created, or Content - content item updated will alert you when any new content items are added or modified. Please note that if the module under which the content is created is set to draft (hidden) no notification will be sent.


Tutorial Videos


Notifications FAQs


Related Resources and Programming

Coming Soon!


Related Tools

Classlist

Discussions

Announcements


Need More Help?

If you're still having trouble, please contact the CourseLink Support team for assistance.