
Share OneDrive Video Files via CourseLink’s Content Tool
Introduction
As more video resources end up on OneDrive via Teams recordings and the SCS Zoom Transfer Tool, knowing how to share those video files via CourseLink’s Content tool with proper access permissions is an important skill. This guide will demonstrate the process for instructors to properly link and share a video file from OneDrive on CourseLink.
Getting Video Files on OneDrive
In some cases, such as recorded Teams meetings or Zoom meetings that have been transferred from the Zoom cloud to OneDrive using OpenEd’s Zoom Transfer Tool, video files will already be present on an instructor’s UofG OneDrive account.
If there is a need to add videos to OneDrive from other sources, we would recommend visiting the CCS OneDrive for Business support page or contacting their Help Desk (58888help@uoguelph.ca or x.58888).
Sharing Videos on OneDrive with a CourseLink Classlist
Any CourseLink site with a Classlist-linked Microsoft Security Group can easily share a OneDrive video file with any students who are on the CourseLink course site’s Classlist.
Please visit our Classlist-linked Microsoft Security Group page for information on how to enable and locate your linked security group code.
Once you have your security group code, please follow the steps below to share your OneDrive video file with any users that appear on your CourseLink course site’s Classlist.
- Open a web browser and access Webmail, then use the apps menu (9 squares) to access OneDrive.

- Navigate to My files from the left menu.

- Locate the folder that contains the file you want to share and select it to show the file.
- Hover your mouse over the file to reveal and click on the Share icon that appears.

- Enter the security group code for the course site you want to share the video on and wait for OneDrive to locate the matching code, then select it and click Copy link

- Continue to the next section to learn how to use that copied link in CourseLink’s Content tool.
NOTE: Security groups refresh daily throughout the semester with updated student registrations. It may take up to 24 hours before a new student gains access to a resource shared via a Classlist-linked Microsoft Security Group.
Using the Content Tool to Link to a OneDrive Video File
Once the video file is shared with a course site’s Classlist-linked Microsoft Security Group, you may add it to your CourseLink course site by linking to the video from the Content tool. To do that, please follow the steps below:
- Navigate to CourseLink and access the course site where you want to add a link to a video file shared using a Classlist-linked Microsoft Security group on OneDrive.
- Select Content from the navigation bar.
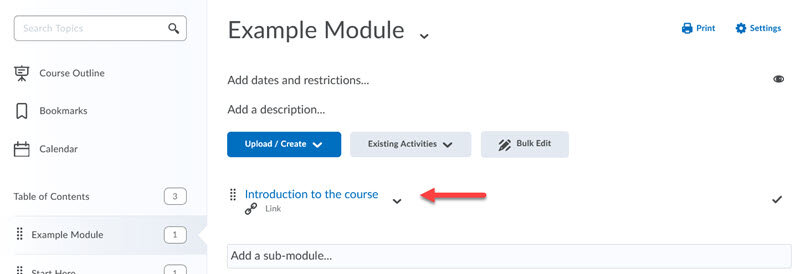
- Select or create a module where you would like to add the video link.

- On the right side of the screen, select the Upload/Create option, then select Create a Link.

- Enter a title that describes the video’s content and paste in the URL from the link that was generated when the video was shared using the security group code (see the above section Sharing Videos on OneDrive with a CourseLink Classlist), then click Create.

Note: Open as External Resource should be selected by default. If it is not, please ensure it is selected.
- The video will now be accessible by anyone on that course site’s Classlist via the Content tool.
Need More Help?
If you're still having trouble, please contact the CourseLink Support team for assistance.